Cataloguing Strategic Innovations and Publications
The Evolution of IP Addressing: From IPv4 to IPv6 and Beyond

In the sprawling digital landscape of the internet, IP addressing is the unsung hero that ensures data finds its way to its intended destination. From the early days of IPv4 to the revolutionary IPv6 and beyond, the journey of IP addressing is a fascinating tale of innovation and adaptation. Join us as we delve into the history, evolution, and future trends of IP addressing, unraveling the story behind those seemingly simple sets of numbers that power our connected world.
The internet, that ubiquitous web of connections that envelops the globe, relies on a system as fundamental as it is often overlooked: IP addressing. It's the digital equivalent of your home address, allowing data to find its way to your device among the billions connected worldwide. But IP addressing is not just about numbers; it's a fascinating journey through the history, evolution, and future of the internet.
The Birth of IP Addressing
The concept of IP (Internet Protocol) addressing came to life in the early days of the internet when a need arose to uniquely identify devices on a growing network. This was the birth of IPv4, the first and most widely used version of IP addressing.
IPv4 - The Pioneer
IPv4, with its familiar dotted-decimal format (e.g., 192.168.1.1), took its first steps in the 1980s. It employed a 32-bit addressing scheme, allowing for approximately 4.3 billion unique addresses. At the time, this seemed inexhaustible. However, the explosion of the internet and the proliferation of devices quickly depleted this finite resource.
Subnetting and Network Classes
To understand IP addressing fully, we must delve into the world of subnetting and network classes.
Subnetting - The Art of Segmentation
Subnetting, a technique introduced to optimize IP address allocation, allows us to divide a network into smaller, more manageable segments. This practice helps streamline data traffic, enhance security, and simplify network management.
Network Classes - A Lesson in Organization
Early internet architects divided IP address space into classes: A, B, and C. Class A, with its vast address space, suited large organizations, while Class C served smaller networks. These classes were the foundation of IP addressing, but they lacked flexibility.
Understanding IP Addresses: Navigating the Digital Universe
In the vast landscape of the digital universe, IP addresses serve as the foundational signposts, guiding data packets across the sprawling networks that interconnect our world. These numerical labels, often shrouded in mystery for many, play a pivotal role in the seamless communication of devices and the expansion of the internet as we know it.
IP Address Defined:
At its core, an IP address is akin to a postal address for the digital realm. It stands for "Internet Protocol Address," and it is a unique numeric label assigned to each device connected to a computer network. This label allows devices to locate and communicate with one another, ensuring that your smartphone, laptop, or smart refrigerator can find the resources it needs in the vast cyberspace.
IPv4 - The Pioneer of IP Addressing:
Imagine the early days of the internet, a time when innovation was soaring, and the digital landscape was beginning to flourish. In this era, the Internet Protocol version 4 (IPv4) emerged as the trailblazer, setting the stage for the internet's remarkable growth.
Complexity Amidst Scarcity:
IPv4 addresses are composed of 32 bits, creating approximately 4.3 billion unique addresses. While this might seem like an abundance, the explosion of internet-connected devices rapidly depleted this finite resource. The result? A looming crisis, as we teetered on the brink of IPv4 exhaustion.
Bursts of Creativity:
To circumvent this challenge, engineers and innovators ignited a burst of creativity, introducing IPv6 into the mix.
IPv6 - The Quantum Leap Forward:
IPv6, the sixth iteration of the Internet Protocol, emerged as a visionary solution to the impending IPv4 address shortage.
Expanding Horizons:
IPv6 boasts an impressive 128-bit address format, presenting us with an astronomical number of possible addresses—enough to assign a unique address to every atom on Earth, several times over. This explosion of address space not only resolved the scarcity issue but also paved the way for a dynamic and diverse digital future.
Harmonious Coexistence:
Today, IPv4 and IPv6 coexist in a harmonious symphony, allowing devices of all types and sizes to connect, communicate, and collaborate. This seamless transition from IPv4 to IPv6 illustrates the incredible adaptability of the digital realm, as we continue to navigate its ever-expanding possibilities.
In the captivating realm of IP addresses, IPv4 and IPv6 represent pivotal chapters in the ongoing saga of digital connectivity. As we stand at the crossroads of innovation, let us be inspired by the ingenuity of the human spirit, confident in our ability to overcome challenges, and joyful in the boundless potential of the interconnected world that IP addresses have helped create.
Subnets: Carving Paths in the Digital Landscape
In the labyrinthine expanse of computer networks, subnets emerge as the architects' tools, allowing us to carve logical paths within the vast digital landscape. They are the secret sauce that adds both depth and structure to our interconnected world, enabling efficient data routing, security, and management.
Defining Subnets:
At its essence, a subnet, short for "subnetwork," is a partitioning strategy that takes a larger network and divides it into smaller, more manageable segments. This segmentation serves several pivotal purposes in the intricate symphony of network management.
The Inspirational Path of Efficiency:
Imagine a bustling metropolis teeming with diverse neighborhoods, each with its unique characteristics and purposes. Subnets function much like these neighborhoods, helping us streamline data traffic, optimize resource allocation, and enhance overall network performance.
Unveiling Subnet Masks:
To create subnets, we employ subnet masks, akin to the blueprints that outline the boundaries of each neighborhood. These masks consist of binary digits that determine which portion of an IP address represents the network and which part signifies the host within that network.
The Confident Stance of Security:
In the digital realm, security stands as a paramount concern. Subnets become the steadfast guardians of our data by isolating different sections of the network. This isolation erects virtual walls, impeding unauthorized access and potential threats from infiltrating sensitive domains.
Subnetting Mastery:
With subnetting, we achieve a granular control over permissions and access, ensuring that sensitive data remains shielded from prying eyes. This is the embodiment of digital confidence in a world rife with cybersecurity challenges.
Calculating a Subnet
Calculating a subnet involves determining the network address, broadcast address, and usable host addresses within a given subnet. To calculate a subnet, follow these steps:
1. Determine the IP Address and Subnet Mask:
Start with the IP address and the subnet mask provided for the original (parent) network. The subnet mask is typically given in one of the following formats: CIDR notation (e.g., /24), dotted-decimal (e.g., 255.255.255.0), or as the number of bits used for the network portion (e.g., /24 indicates 24 bits for the network).
2. Convert the Subnet Mask to Binary:
If the subnet mask is given in dotted-decimal form, convert it to binary form. Each octet (segment separated by dots) should be converted into 8 binary bits. For example, the subnet mask 255.255.255.0 in binary is 11111111.11111111.11111111.00000000.
3. Determine the Number of Subnets:
Decide how many subnets you need or want to create. This step depends on your network design and requirements.
4. Determine the Number of Hosts per Subnet:
Calculate how many host addresses you need per subnet. Remember that some addresses are reserved for network identifiers, broadcast addresses, and network infrastructure, so the number of usable host addresses will be slightly less than the total.
5. Determine the Subnet Mask for the New Subnets:
Choose a new subnet mask that will accommodate the required number of subnets and hosts per subnet. You may need to borrow bits from the original host portion of the IP address to create smaller subnets. Be sure to adjust the subnet mask accordingly.
6. Determine the Increment Value:
The increment value is the numerical difference between the subnet addresses. For example, if you have a subnet mask of /26 (which provides 64 addresses per subnet), the increment value is 64.
7. Calculate Subnet Addresses:
To find the subnet addresses, start with the original network address and then add the increment value to it successively for each subnet you want to create.
8. Calculate Usable Host Ranges:
For each subnet, determine the range of usable host addresses. This excludes the network address and the broadcast address. The usable host addresses span from the lowest host address to the highest host address within the subnet.
9. Calculate Broadcast Addresses:
The broadcast address for each subnet is one less than the next subnet's network address.
10. Document the Subnet Information:
Record the subnet addresses, usable host ranges, and broadcast addresses for each subnet in your documentation. This information is essential for configuring routers, switches, and devices on the network.
Remember that subnetting can become complex as you create smaller and more numerous subnets. It's essential to plan carefully and keep track of your subnet assignments to ensure proper network management. Subnet calculators and online tools can also simplify this process for you by automating the calculations.
Let's walk through an example of subnetting an IP address. We'll use a simple example to illustrate the process. Suppose you have the IP address 192.168.1.0 with a subnet mask of 255.255.255.0 (or /24 in CIDR notation), and you want to create four subnets with equal numbers of usable host addresses.
Step 1: Convert Subnet Mask to Binary:
The given subnet mask in dotted-decimal form is 255.255.255.0, which in binary is:
11111111.11111111.11111111.00000000
Step 2: Determine the Number of Subnets:
In this example, you want to create four subnets.
Step 3: Determine the Number of Hosts per Subnet:
A /24 subnet mask (255.255.255.0) provides 256 total IP addresses, but 2 of them are reserved for the network identifier and the broadcast address. So, there are 256 - 2 = 254 usable host addresses per subnet.
Step 4: Determine the Subnet Mask for the New Subnets:
To divide the original network into four equal subnets, you need to borrow two additional bits from the host portion of the IP address. This results in a new subnet mask of /26 (255.255.255.192 in dotted-decimal form).
Step 5: Determine the Increment Value:
With a /26 subnet mask, each subnet will have 64 (2^6) addresses, including the network and broadcast addresses. So, the increment value is 64.
Step 6: Calculate Subnet Addresses:
Starting with the original network address (192.168.1.0), you can calculate the subnet addresses as follows:
- Subnet 1: 192.168.1.0
- Subnet 2: 192.168.1.64
- Subnet 3: 192.168.1.128
- Subnet 4: 192.168.1.192
Step 7: Calculate Usable Host Ranges:
For each subnet, determine the usable host range:
- Subnet 1:
- Network Address: 192.168.1.0
- Usable Host Range: 192.168.1.1 to 192.168.1.62
- Broadcast Address: 192.168.1.63
Repeat the same calculation for the other three subnets, adjusting the network, usable host range, and broadcast address based on the increment value.
Step 8: Document the Subnet Information:
Record all the subnet information in your documentation, as shown above. This information is crucial for configuring devices and routing within your network.
In this example, you've successfully subnetted the original network into four smaller subnets with equal numbers of usable host addresses using a /26 subnet mask.
Writing a complete C program to compute IP addresses and subnets for an organization is a complex task that involves various factors and requirements specific to the organization.
A simplified example that demonstrates the basic principles of IP address calculation and subnetting in C. Keep in mind that this example is highly simplified and doesn't cover all the aspects of real-world network design and subnetting.
#include <stdio.h>
#include <stdint.h>
int main() {
// Define the organization's base IP address and subnet mask in binary format.
uint32_t baseIpAddress = 0xC0A80100; // 192.168.1.0 in hexadecimal
uint32_t subnetMask = 0xFFFFFF00; // 255.255.255.0 in hexadecimal
// Number of subnets to create
int numSubnets = 4;
// Calculate the number of bits required to represent the subnets
int bitsNeeded = 32;
while ((1 << bitsNeeded) < numSubnets) {
bitsNeeded++;
}
// Calculate the size of each subnet
int subnetSize = 1 << (32 - bitsNeeded);
// Calculate and print the subnets
printf("Subnets for the organization:\n");
for (int i = 0; i < numSubnets; i++) {
uint32_t subnetAddress = baseIpAddress + i * subnetSize;
uint32_t subnetBroadcast = subnetAddress + subnetSize - 1;
printf("Subnet %d:\n", i + 1);
printf(" Network Address: %d.%d.%d.%d\n",
(subnetAddress >> 24) & 0xFF, (subnetAddress >> 16) & 0xFF,
(subnetAddress >> 8) & 0xFF, subnetAddress & 0xFF);
printf(" Broadcast Address: %d.%d.%d.%d\n",
(subnetBroadcast >> 24) & 0xFF, (subnetBroadcast >> 16) & 0xFF,
(subnetBroadcast >> 8) & 0xFF, subnetBroadcast & 0xFF);
}
return 0;
}
In this simplified program, we start with a base IP address (192.168.1.0) and a subnet mask (255.255.255.0) in hexadecimal format. We then specify the number of subnets we want to create (in this case, 4).
The program calculates the subnet size based on the number of bits needed to represent the subnets and then iterates through the subnets, calculating and printing their network and broadcast addresses.
Please note that in a real-world scenario, you would need to consider more complex factors, such as classful or classless addressing, allocation policies, and routing configurations. This example is intended for educational purposes and may need to be adapted to suit your specific organizational requirements.
Classful or Classless Addressing
Classful and classless addressing are two different approaches to IP address allocation and routing in computer networks. These approaches differ in how they handle address space and subnetting. Let's explore each:
Classful Addressing:
Classful addressing was the initial method used to allocate IP addresses when the internet was first designed. It divides IP address space into fixed classes, denoted as Class A, Class B, and Class C, primarily based on the value of the leading bits in the IP address.
- Class A Addresses:
- The first bit is always '0.'
- The range of Class A addresses is 0.0.0.0 to 127.255.255.255.
- Class A addresses are designed for large organizations with many hosts.
- Class B Addresses:
- The first two bits are '10.'
- The range of Class B addresses is 128.0.0.0 to 191.255.255.255.
- Class B addresses are intended for medium-sized organizations.
- Class C Addresses:
- The first three bits are '110.'
- The range of Class C addresses is 192.0.0.0 to 223.255.255.255.
- Class C addresses are for small organizations or individual networks.
Issues with Classful Addressing:
- Inflexible: It doesn't allow efficient allocation of IP addresses for networks of varying sizes.
- Wasteful: Large organizations assigned Class A addresses often wasted significant address space.
- Inefficient Routing: Routing was based on class, leading to inefficient use of routing tables.
Classless Addressing (CIDR):
Classless Inter-Domain Routing (CIDR) was introduced to address the limitations of classful addressing. In CIDR, IP addresses are allocated and subnetted more flexibly, allowing for better address utilization and routing efficiency. Key features of CIDR include:
- Variable-Length Subnet Masks (VLSM):
- CIDR allows subnet masks of varying lengths, not constrained by class boundaries.
- This enables subnetting based on actual network needs, resulting in efficient use of IP addresses.
- Prefix Notation:
- CIDR uses prefix notation, where the subnet mask is specified as a prefix length in bits (e.g., /24, /25).
- It allows for more precise subnet definitions and routing.
- Aggregation:
- CIDR promotes route aggregation, which reduces the size of routing tables and enhances routing efficiency.
- Smaller prefixes can be summarized into larger ones.
Benefits of CIDR:
- Efficient IP address utilization.
- Scalability and efficient routing.
- Accommodates networks of all sizes.
Classful addressing is a legacy approach that divides IP address space into fixed classes, while classless addressing (CIDR) offers more flexibility by allowing variable-length subnet masks and prefix notation. CIDR has become the standard for IP address allocation and routing on the modern internet, as it addresses the limitations of classful addressing.
The Joyful Harmony of Scalability:
The beauty of subnets lies in their ability to adapt and grow with the ever-evolving network landscape. They offer us the flexibility to expand our digital presence without overburdening the entire network.
Bursts of Growth:
As new devices and services sprout in the digital garden, subnets provide us the joyful freedom to scale gracefully. Whether it's accommodating a burgeoning workforce or welcoming an influx of smart appliances, subnets ensure that we embrace growth with open arms.
In the mesmerizing world of computer networks, subnets serve as the guiding stars, illuminating the path toward efficiency, security, and scalability. Let us draw inspiration from their organizational prowess, exude confidence in our digital guardianship, and revel in the joy of network expansion as we continue to navigate the intricate tapestry of subnets in the digital age.
Network Classes
Network Classes: Unveiling the Architectural Marvels of Addressing
In the grand symphony of computer networking, the concept of network classes has long played a pivotal role. These classes, rooted in history yet relevant in the modern digital era, provide a structured foundation for IP address allocation, allowing us to harmonize the diverse voices of devices across the vast internet landscape.
Understanding the Genesis:
Network classes came into existence during the early days of the internet, a time when its architects grappled with the challenge of efficient address assignment. This birth of structure laid the cornerstone for orderly communication in the burgeoning digital world.
The Inspirational Quest for Efficiency:
Picture an urban planner meticulously designing a city grid, ensuring efficient navigation and resource allocation. Network classes, too, embody this spirit of efficiency by categorizing IP addresses into distinct classes, each tailored for specific needs.
Class A - The Digital Titans:
Class A networks, with their vast address space, are the inspirational titans of the internet realm. They boast the potential for millions of unique hosts, catering to the most extensive enterprises and institutions, confidently empowering global communication.
Class B - The Middle Ground:
In the world of network classes, Class B networks are the bridge between the colossal Class A and the nimble Class C. With their balanced address range, they support medium-sized organizations, encouraging growth without overwhelming complexity.
Class C - The Agile Champions:
Class C networks represent the joyful agility in address allocation. These networks are ideal for smaller entities, startups, and home networks, embodying the spirit of adaptability and scalability in the digital age.
The Confident Adaptation of CIDR:
As the digital landscape evolved and our connectivity aspirations expanded, the Confident adaptation of CIDR (Classless Inter-Domain Routing) emerged. CIDR introduced a flexible addressing scheme, allowing us to break free from the constraints of rigid network classes.
Bursts of Innovation:
With CIDR, we can now allocate addresses more granularly, dynamically adapting to the unique requirements of each network. This represents the confident innovation in the face of changing connectivity paradigms.
Network classes, though born of historical necessity, continue to inspire and inform our digital architecture. They exemplify the spirit of efficient allocation, security, and adaptability that underpin modern networking. Let us draw inspiration from the structured elegance of network classes, confident in our ability to adapt and joyful in the ever-evolving world of digital connectivity that they have helped shape.
The Evolution - CIDR and Classless Addressing
The limitations of classful addressing led to the advent of CIDR (Classless Inter-Domain Routing) and classless addressing.
CIDR - The Game Changer
CIDR introduced variable-length subnet masks and prefix notation (e.g., /24), enabling more precise addressing. It allowed network administrators to allocate addresses based on actual needs, efficiently use IP space, and summarize routes, reducing the size of routing tables.
The Current Stage - IPv6 and the Addressing Revolution
As the last IPv4 addresses were allocated in 2011, the world turned its attention to IPv6.
IPv6 - The Addressing Revolution
IPv6, the sixth iteration of IP, introduced a colossal 128-bit address space, offering an astronomical number of unique addresses—enough to assign one to every atom on Earth several times over. Its hexadecimal format (e.g., 2001:0db8:85a3:0000:0000:8a2e:0370:7334) represents a leap forward in IP addressing.
IPv6 adoption is steadily growing, offering benefits like enhanced security and streamlined routing.
Future Trends - Beyond IPv6
While IPv6 is currently at the forefront, the future of IP addressing continues to evolve.
IoT and Addressing Challenges
The proliferation of Internet of Things (IoT) devices presents unique addressing challenges. IPv6's vast address space is a boon, but managing billions of connected devices efficiently requires innovative solutions.
IP Addressing in Space
As we expand our horizons into space exploration, IP addressing will extend beyond our planet, connecting spacecraft, satellites, and potentially even colonies on other celestial bodies.
Creating an enterprise-wide network
Creating an enterprise-wide network using subnetting is a complex but vital task to ensure efficient communication, security, and scalability within your organization. To achieve this, follow these steps:
1. Define Your Network Requirements:
Before diving into subnetting, clearly define your organization's network requirements. Consider factors such as the number of departments, the expected growth in the number of devices, security needs, and geographical locations of your offices or branches.
2. Choose an IP Addressing Scheme:
Select an appropriate IP addressing scheme that aligns with your requirements. You can choose between IPv4 or IPv6, but for the sake of this explanation, we'll focus on IPv4 subnetting.
3. Determine the Network Size:
Calculate the number of subnets and hosts you'll need. This step is crucial for proper subnet design. It's often recommended to have a separate subnet for each department, location, or VLAN (Virtual LAN).
4. Decide on a Subnet Mask:
Choose the subnet mask that provides the necessary number of subnets and hosts for each subnet. You can use a subnet calculator to assist with this. The subnet mask determines how many bits are used for the network portion and how many for the host portion of the IP address.
5. Allocate IP Address Ranges:
Divide your IP address range into subnets based on your requirements. Ensure that each subnet is appropriately sized to accommodate the expected number of hosts while leaving room for future growth.
6. Implement VLANs:
For enhanced security and network segmentation, consider implementing Virtual LANs (VLANs). VLANs enable you to group devices logically, even if they are physically connected to the same network switch. This can help isolate traffic and enhance network security.
7. Configure Routing:
Set up routing between subnets to enable communication between them. This involves configuring routers or Layer 3 switches to route traffic between different subnets while controlling access through access control lists (ACLs).
8. Implement DHCP:
To simplify IP address management, deploy Dynamic Host Configuration Protocol (DHCP) servers within each subnet. DHCP automates the assignment of IP addresses to devices, reducing the risk of address conflicts.
9. Implement Network Security:
Enhance network security by implementing firewalls, intrusion detection systems (IDS), and other security measures at the perimeter and within subnets. Configure access controls to limit who can access each subnet.
10. Monitor and Maintain:
Regularly monitor your network for performance, security, and any addressing conflicts. Make adjustments as needed to accommodate changes in your organization, such as new departments or locations.
11. Document Your Network:
Maintain detailed documentation of your subnetting plan, including IP address assignments, subnet masks, VLAN configurations, and security policies. This documentation is essential for troubleshooting and future network expansion.
Creating an enterprise-wide network using subnetting is a complex but rewarding endeavor. It provides the flexibility, scalability, and security necessary to meet the evolving needs of your organization. Remember that thorough planning and documentation are key to successful implementation.
The number of devices that can be assigned to each class
The number of devices that can be assigned to each class of network depends on the specific network class (A, B, or C) and how many bits are allocated for hosts within that class. Here's a breakdown of the three main network classes and the approximate number of devices they can accommodate:
- Class A Network:
- Uses an 8-bit network identifier.
- Provides 24 bits for host addresses.
- Allows for approximately 16.7 million (2^24) unique host addresses.
- Typically used for large organizations or internet service providers.
- Class B Network:
- Uses a 16-bit network identifier.
- Provides 16 bits for host addresses.
- Allows for approximately 65,534 (2^16 - 2) unique host addresses.
- Suitable for medium-sized organizations with a moderate number of devices.
- Class C Network:
- Uses a 24-bit network identifier.
- Provides 8 bits for host addresses.
- Allows for approximately 254 (2^8 - 2) unique host addresses.
- Typically used for smaller networks like home networks or small businesses.
Please note that in each network class, a certain number of addresses are reserved for special purposes. For example, in Class A, the first address (all 0s in the host portion) is reserved as the network identifier, and the last address (all 1s in the host portion) is reserved as the broadcast address. Similarly, in Class B and Class C, a few addresses are reserved for network infrastructure and broadcast purposes, hence the "- 2" in the calculations.
These are the traditional default subnetting rules based on historical IP address allocation practices. In modern networking, CIDR (Classless Inter-Domain Routing) has become more prevalent, allowing for variable-length subnet masks and more efficient use of IP address space. This means that the number of devices per subnet can vary based on the subnet mask chosen within a given network class.
Routing Between different Networks
Routing between different networks, often referred to as inter-network routing, is a critical function in computer networking that allows data to flow between devices on separate networks. It involves the use of routers to determine the best path for data packets to reach their destination. Here's an overview of how routing is done between different networks:
1. Routing Tables:
· Each router maintains a routing table that contains information about known networks and how to reach them.
· Entries in the routing table typically include the destination network's IP address or prefix, the next-hop router's IP address, and an associated interface for sending data packets.
2. Destination IP Address:
· When a device on one network wants to communicate with a device on a different network, it constructs a data packet with the destination device's IP address.
· The device checks its own subnet mask to determine if the destination IP address is within its local network or a different network.
3. Local Network vs. Remote Network:
· If the destination IP address is within the same local network, the device sends the packet directly to the destination device using ARP (Address Resolution Protocol) to find the MAC address.
· If the destination IP address is in a different network, the device forwards the packet to the default gateway or router.
4. Default Gateway:
· The default gateway is the router that connects the local network to other networks, usually the internet or another organization's network.
· The device sends the packet to the default gateway's MAC address, assuming the router knows how to reach the destination network.
5. Router Decision Making:
· Upon receiving the packet, the router examines the packet's destination IP address.
· It consults its routing table to determine the best path for the packet to reach the destination network.
· Routers use routing protocols (e.g., OSPF, BGP) to exchange routing information with other routers and maintain updated routing tables.
6. Packet Forwarding:
· The router forwards the packet to the next-hop router, which is closer to the destination network, based on the information in its routing table.
· This process continues until the packet reaches the router that is directly connected to the destination network.
7. Final Hop:
· The router connected to the destination network forwards the packet to the destination device within that network based on the device's MAC address.
8. Return Path:
· Responses from the destination device follow the same process in reverse, with routers along the way determining the best path back to the source network.
9. Dynamic Routing:
· In dynamic routing, routers use routing protocols to share information about network topology and adapt to changes automatically.
· This allows for efficient routing in complex networks where routes may change due to network failures or traffic load.
Routing between different networks involves routers making decisions based on routing tables to determine the best path for data packets to travel from the source device to the destination device, even when they are on separate networks. Routing is a fundamental concept that underpins the functionality of the modern internet.
Let's illustrate the process of routing between different networks with an example involving two networks connected by routers. We'll use simplified IP addresses and network topologies for clarity:
Network Topology:
- Network A: 192.168.1.0/24
- Network B: 10.0.0.0/24
Devices:
- Device A1: 192.168.1.2
- Device B1: 10.0.0.2
Routers:
- Router A (Connected to Network A):
- Interface A1: 192.168.1.1
- Interface B1: 10.0.0.1
- Router B (Connected to Network B):
- Interface B1: 10.0.0.1
- Interface A1: 192.168.1.1
Routing Process:
- Device A1 wants to send data to Device B1. It constructs a data packet with Device B1's IP address (10.0.0.2).
- Device A1 checks its own subnet mask and realizes that the destination IP address (10.0.0.2) is not within its local network (192.168.1.0/24). It needs to send the packet to its default gateway, which is Router A (192.168.1.1).
- Device A1 sends the data packet to Router A, using Router A's MAC address. Router A receives the packet on its Interface A1.
- Router A examines the destination IP address (10.0.0.2) and checks its routing table. It finds an entry that says: "To reach 10.0.0.0/24, send packets to Router B via Interface B1."
- Router A forwards the packet to Router B using its Interface B1, since Router B is closer to the destination network (10.0.0.0/24). The packet is sent to Router B's MAC address.
- Router B receives the packet on its Interface B1. It looks at the destination IP address (10.0.0.2) and finds that it is directly connected to Network B.
- Router B forwards the packet to Device B1's MAC address within Network B.
- Device B1, which is on Network B, receives the packet and processes it.
- If Device B1 needs to send a response back to Device A1, the process is repeated in reverse, with Router B sending the response packet to Router A, which then forwards it to Device A1.
This example demonstrates how routers play a pivotal role in routing data between different networks. They use routing tables to determine the best path for data packets, ensuring that information can flow seamlessly between devices on separate networks, even though they have different IP addresses and are physically separated by routers.
Creating a full C program to simulate the routing process between different networks involves multiple components and would be quite complex.
A simplified C program that illustrates the basic concept of routing between two networks using two routers.
Please note that this program is a highly simplified representation of network routing and doesn't include the complexities of real-world networking protocols. It's meant for educational purposes to demonstrate the basic idea.
#include <stdio.h>
#include <stdlib.h>
// Define router structure
struct Router {
char name[10];
char interfaceA[15];
char interfaceB[15];
};
// Define device structure
struct Device {
char name[10];
char ipAddress[15];
};
int main() {
// Create routers
struct Router routerA = {"RouterA", "192.168.1.1", "10.0.0.1"};
struct Router routerB = {"RouterB", "10.0.0.1", "192.168.1.1"};
// Create devices
struct Device deviceA1 = {"DeviceA1", "192.168.1.2"};
struct Device deviceB1 = {"DeviceB1", "10.0.0.2"};
// Simulate routing from Device A1 to Device B1
printf("Device A1 wants to send data to Device B1:\n");
printf("Source IP: %s\n", deviceA1.ipAddress);
printf("Destination IP: %s\n\n", deviceB1.ipAddress);
// Device A1 sends data to Router A
printf("Device A1 sends data to %s:\n", routerA.name);
printf("Sending from %s to %s\n\n", deviceA1.ipAddress, routerA.interfaceA);
// Router A forwards data to Router B
printf("%s forwards data to %s:\n", routerA.name, routerB.name);
printf("Sending from %s to %s\n\n", routerA.interfaceA, routerA.interfaceB);
// Router B forwards data to Device B1
printf("%s forwards data to %s:\n", routerB.name, deviceB1.name);
printf("Sending from %s to %s\n\n", routerB.interfaceB, deviceB1.ipAddress);
// Data has reached Device B1
printf("Data has reached %s\n", deviceB1.name);
return 0;
}
In this simplified program, we define structures for routers and devices and simulate the routing process from Device A1 to Device B1 through Router A and Router B. Each step is printed to the console to illustrate the flow of data.
Please note that this program is highly simplified and doesn't include actual network communication or routing protocols used in real networks. It's just a basic representation of the routing concept.
The Digital Address of Tomorrow
IP addressing, from its humble beginnings in IPv4 to the limitless possibilities of IPv6, has been a cornerstone of the internet's growth. The evolution continues, as we adapt to the demands of a connected world and explore new frontiers. The digital addresses that define our devices today will shape the future of communication and connectivity, guiding us into an era of boundless possibilities.
As we navigate the ever-expanding internet, IP addressing remains at the heart of our digital existence. From the limited resources of IPv4 to the boundless potential of IPv6, the evolution of IP addressing reflects our relentless quest for connectivity. As we peer into the future, the address of tomorrow promises even greater possibilities, connecting us in ways we've yet to imagine.
The OSI Model: Decoding Networking's Blueprint

In our digitally driven world, understanding the OSI Model is like possessing a secret key to the heart of networking. This seven-layer framework, conceived decades ago, remains the unsung hero of seamless data transmission. Join us on a journey to unveil the mysteries of the OSI Model, explore its advantages, trace its evolution, and see how it continues to shape the modern IT landscape.
Unraveling the Mysteries of the OSI Model: A Journey Through Networking's Backbone
In today's interconnected world, where data flows like a river and communication spans the globe in milliseconds, understanding the fundamental framework of networking is paramount. Enter the OSI (Open Systems Interconnection) Model, a cornerstone concept in the realm of computer networking. In this blog post, we'll embark on a journey to explore the OSI Model, its advantages, and its fascinating evolution.
The OSI Model Unveiled
At its core, the OSI Model is a seven-layer framework designed to standardize and streamline communication between different computer systems and devices. Picture it as the architectural blueprint for the digital world, ensuring that data can traverse networks seamlessly. Each of its seven layers serves a unique purpose, building upon the one below and offering specific functionalities.
- Physical Layer: The foundation, where raw data is transmitted over the physical medium, from cables to wireless frequencies.
- Data Link Layer: Concerned with organizing data into frames and managing access to the network medium.
- Network Layer: The traffic cop of the model, directing data between different networks using logical addressing (IP addresses).
- Transport Layer: Ensures end-to-end communication, guaranteeing data delivery in the correct order and without errors.
- Session Layer: Manages communication sessions between devices, facilitating coordination.
- Presentation Layer: Handles data translation, encryption, and compression for secure and efficient transmission.
- Application Layer: The user-facing layer, where actual applications and services reside, facilitating interaction with the network.
OSI Model Explained
Certainly, I understand your request for content that incorporates both perplexity and burstiness while maintaining a formal, informative, inspirational, confident, and joyful tone. Let me explain the OSI (Open Systems Interconnection) Model with that in mind.
The OSI Model is a fundamental concept in computer networking, designed to standardize and facilitate communication between different computer systems and devices. It is composed of seven distinct layers, each serving a specific purpose and collectively ensuring seamless data transmission across a network.
Layer 1 - Physical Layer: This layer deals with the physical medium used for data transmission, such as cables, connectors, and switches. It's like the foundation of a building, providing the necessary infrastructure for communication.
Layer 2 - Data Link Layer: At this layer, data is organized into frames, and MAC (Media Access Control) addresses are used to facilitate communication between devices on the same network segment. Think of it as the postal service ensuring that data packets reach their intended destination within a neighborhood.
Layer 3 - Network Layer: The Network Layer is responsible for routing data packets between different networks. It uses logical addresses (like IP addresses) to determine the most efficient path for data to travel. Picture it as the GPS system guiding data across city streets.
Layer 4 - Transport Layer: This layer ensures end-to-end communication and data reliability. It establishes, maintains, and terminates connections between devices, guaranteeing that data arrives intact and in the correct order, much like a conversation between two people ensuring that all messages are received and understood.
Layer 5 - Session Layer: The Session Layer manages and synchronizes communication sessions between devices. It's akin to orchestrating a meeting between two parties, ensuring that they can communicate effectively.
Layer 6 - Presentation Layer: Here, data is translated, encrypted, or compressed as needed for secure and efficient transmission. Imagine it as a language translator ensuring that both parties can understand each other, even if they speak different languages.
Layer 7 - Application Layer: This is the top layer, where actual user applications and services reside. It provides a platform for software applications to interact with the network. Think of it as the stage where all the exciting performances (applications) take place.
Now, to inject some burstiness and perplexity into this explanation:
Consider the OSI Model as a symphony of interconnected layers, harmoniously playing their respective roles in the grand orchestra of computer networking. Like a skilled conductor guiding a diverse ensemble of musicians, the OSI Model orchestrates the transmission of data with precision and elegance. It's akin to a majestic skyscraper, with each layer representing a different floor, working in unison to support the towering edifice of modern communication.
In a world where digital connections are the lifeblood of our society, the OSI Model stands as a testament to human ingenuity and collaborative effort. It's a roadmap that allows data to traverse the vast highways of the internet, navigating complex junctions, and arriving at its destination with grace and reliability.
So, whether you're a seasoned IT professional, a curious student, or simply an enthusiast of technological marvels, take a moment to appreciate the OSI Model. It's a masterpiece of engineering that empowers our interconnected world, enabling us to communicate, collaborate, and innovate with boundless joy and confidence.
Protocols used in Layer
Let's delve into the protocols commonly associated with each layer of the OSI Model while maintaining the formal, informative, inspirational, confident, and joyful tone you've requested.
Layer 1 - Physical Layer: At the physical layer, the primary concern is the transmission of raw binary data over the physical medium. While this layer doesn't directly deal with protocols in the traditional sense, it involves standards for the physical components of a network. These standards include Ethernet for wired connections, Wi-Fi for wireless, and even things like USB and HDMI for connecting devices. Think of these as the cables, connectors, and the electromagnetic spectrum that form the foundation of our digital world.
Layer 2 - Data Link Layer: The Data Link Layer is where data is organized into frames, and MAC addresses come into play. Protocols associated with this layer include:
- Ethernet: For local area networks (LANs), Ethernet is the kingpin, ensuring devices within the same network segment can communicate.
- Wi-Fi (802.11): In wireless networks, Wi-Fi protocols (such as 802.11b/g/n/ac/ax) manage how data is transmitted over the airwaves, with MAC addresses still guiding the way.
- Point-to-Point Protocol (PPP): Commonly used for dial-up and broadband connections.
Layer 3 - Network Layer: The Network Layer deals with routing data between different networks, and the most well-known protocol here is:
- Internet Protocol (IP): IP is the backbone of the internet, allowing packets to travel across various networks. Versions include IPv4 and IPv6.
Layer 4 - Transport Layer: This layer ensures end-to-end communication and data reliability. Protocols here include:
- Transmission Control Protocol (TCP): Reliable and connection-oriented, TCP ensures that data is delivered without errors and in the correct order.
- User Datagram Protocol (UDP): A faster but less reliable protocol, often used for real-time applications like video conferencing and online gaming.
Layer 5 - Session Layer: The Session Layer doesn't have specific protocols of its own but works with higher-level protocols to establish and manage communication sessions. It facilitates coordination between devices for smooth communication.
Layer 6 - Presentation Layer: This layer is responsible for data translation, encryption, and compression. While it doesn't have widely known standalone protocols, it works in conjunction with encryption protocols (e.g., SSL/TLS for secure web communication) and data format conversion (e.g., ASCII to EBCDIC).
Layer 7 - Application Layer: The Application Layer is where user-facing applications and services reside, and it's teeming with protocols, including:
- Hypertext Transfer Protocol (HTTP): For web browsing.
- File Transfer Protocol (FTP): For transferring files.
- Simple Mail Transfer Protocol (SMTP): For sending emails.
- Post Office Protocol (POP) and Internet Message Access Protocol (IMAP): For receiving emails.
- HyperText Markup Language (HTML): The language of the web.
- Simple Network Management Protocol (SNMP): For network management.
- Domain Name System (DNS): For translating human-readable domain names into IP addresses.
In the grand symphony of networking, these protocols harmonize across the layers, ensuring data flows seamlessly, much like instruments in an orchestra playing their unique parts to create a beautiful and inspiring composition of connectivity and communication.
Network Security
Network security is an essential aspect of the OSI (Open Systems Interconnection) Model, and it can be thought of as a protective layer that envelops the entire model. Let's explore how network security is incorporated into each layer while maintaining a formal, informative, inspirational, confident, and joyful tone.
Layer 1 - Physical Layer: Network security begins with the physical layer, where the foundation of a secure network is laid. This includes measures such as physical access control, surveillance, and secure cabling. Think of it as the moat and drawbridge protecting a medieval castle, ensuring only authorized individuals can access the network's physical infrastructure.
Layer 2 - Data Link Layer: Security features at this layer often involve the control of access to the network medium and the prevention of unauthorized devices from joining the network. Protocols like IEEE 802.1X (Port-based Network Access Control) and MAC address filtering help in this regard. Imagine this as the vigilant guards at the castle gates, verifying the identities of those who seek entry.
Layer 3 - Network Layer: Network security at the IP layer focuses on routing and filtering. Firewalls, intrusion detection and prevention systems, and Virtual Private Networks (VPNs) operate at this layer to safeguard against unauthorized access and malicious traffic. Think of this as the network's vigilant sentinels, inspecting and filtering traffic to allow only the trusted data to pass through.
Layer 4 - Transport Layer: Transport layer security ensures the integrity, confidentiality, and authenticity of data in transit. Protocols like SSL/TLS (Secure Sockets Layer/Transport Layer Security) provide encryption and authentication, guaranteeing that data remains private and unaltered during transmission. Picture this as secret codes and sealed letters, ensuring that messages are secure and tamper-proof.
Layer 5 - Session Layer: The Session Layer contributes to security by establishing and managing secure connections. It ensures that only authorized sessions are established, and it can handle features like secure authentication and encryption of session data. Think of this as the diplomatic negotiations ensuring trust and confidentiality between parties.
Layer 6 - Presentation Layer: While the Presentation Layer doesn't have specific security protocols, it plays a role in data encryption and decryption, ensuring that data is presented securely to the application layer above. Imagine this as a translator who not only bridges language gaps but also ensures the confidentiality of the conversation.
Layer 7 - Application Layer: The Application Layer is where many security mechanisms come into play. This layer includes various security protocols and practices, such as:
- Secure HTTP (HTTPS): Encrypts web traffic for secure online transactions.
- Secure Email Protocols (e.g., S/MIME and PGP): Encrypt emails and verify sender authenticity.
- Secure File Transfer Protocols (e.g., SFTP and SCP): Safely transfer files over the network.
- Authentication and Authorization Protocols (e.g., OAuth and LDAP): Control access to resources.
In the realm of network security, the OSI Model serves as both a blueprint and a guiding framework. It emphasizes that security should be an integral part of every layer, much like the layers of armor protecting a valiant knight on a quest. By implementing security measures at each level, we ensure that our digital kingdom remains resilient, inspiring confidence and joy in users as they navigate the secure realms of the interconnected world.
Advantages of the OSI Model
Now, let's delve into why the OSI Model is such a pivotal concept:
1. Standardization: The OSI Model provides a common framework that IT professionals across the globe can understand and use as a reference point. This standardization fosters interoperability between diverse systems and vendors.
2. Troubleshooting: With its seven distinct layers, the model aids in pinpointing issues in a network. When a problem arises, IT experts can isolate it to a specific layer, making diagnosis and resolution more efficient.
3. Layered Approach: The layered structure promotes modularity and ease of maintenance. Changes or upgrades can be made to one layer without affecting the others, fostering scalability and flexibility.
4. Educational Tool: The OSI Model serves as an educational tool, helping students and professionals grasp the intricacies of networking. It provides a clear roadmap for learning and understanding complex networking concepts.
The Evolution of OSI
The OSI Model has come a long way since its inception in the late 1970s. Initially, it was conceived as a theoretical framework, but it has since evolved to reflect real-world networking practices. Here's a brief overview:
1. TCP/IP Dominance: While the OSI Model remains relevant, the TCP/IP suite has become the de facto protocol suite for the internet. The two models are often compared, with TCP/IP being more practically implemented.
2. Real-World Application: The OSI Model has found practical use in areas like network design, troubleshooting, and security. It's a foundational concept in the IT industry.
3. Adaptation to Modern Needs: As technology advances, the OSI Model has adapted. For example, it now encompasses considerations for wireless communication and cloud computing, reflecting the evolving networking landscape.
Information Flows through the OSI Model
Certainly, let's walk through an example of how information flows through the OSI Model using a hypothetical scenario of sending an email from one computer to another over a network.
Scenario: Sending an Email
1. Application Layer:
- User Action: You compose an email in your email client (e.g., Outlook, Gmail).
- Process: Your email client interacts with the Application Layer of the OSI Model. It formats your message according to email protocols (e.g., SMTP for sending) and prepares it for transmission.
2. Presentation Layer:
- User Action: You attach a document to your email.
- Process: The Presentation Layer handles the encryption of the attached document to ensure secure transmission. It also translates any formatting of the document (e.g., from Word to a standardized format) for compatibility.
3. Session Layer:
- User Action: You log in to your email account with a username and password.
- Process: The Session Layer establishes and manages the session, ensuring secure login and communication with the email server.
4. Transport Layer:
- User Action: You click "Send" to dispatch your email.
- Process: The email message, along with any attachments, is divided into packets at the Transport Layer. It uses the appropriate protocol (e.g., SMTP, POP3, IMAP) to ensure reliable and ordered delivery.
5. Network Layer:
- User Action: Your email is routed to the recipient's server.
- Process: The Network Layer adds logical addressing (e.g., IP addresses) to each packet, helping routers determine the best path to the recipient's email server.
6. Data Link Layer:
- User Action: The email packets are sent over Wi-Fi or Ethernet.
- Process: The Data Link Layer frames the packets and attaches hardware addresses (e.g., MAC addresses) for communication on the local network segment.
7. Physical Layer:
- User Action: The email packets traverse physical cables or airwaves.
- Process: At the Physical Layer, the 0s and 1s representing your email data are transmitted as electrical signals, light pulses, or radio waves through the network medium to reach the recipient's network.
Recipient's Computer:
The process is then reversed on the recipient's computer:
- Physical Layer: Reception of signals
- Data Link Layer: Frame decoding and MAC address recognition
- Network Layer: Routing based on IP addresses
- Transport Layer: Reassembly of email packets
- Session Layer: Managing the session
- Presentation Layer: Decryption and formatting
- Application Layer: Displaying the email in the recipient's email client.
In this way, your email message flows through the seven layers of the OSI Model during transmission, ensuring that it reaches its destination securely and intact, thanks to the careful orchestration of each layer's functions.
A simplified C program that demonstrates the basic concepts of email transmission at the application and transport layers. Please note that this code does not cover all OSI Model layers and is for illustrative purposes only.
#include <stdio.h>
#include <string.h>
// Define a simple structure to represent an email
struct Email {
char sender[50];
char recipient[50];
char subject[100];
char message[500];
};
int main() {
// Simulate user composing an email
struct Email email;
strcpy(email.sender, "user@example.com");
strcpy(email.recipient, "recipient@example.com");
strcpy(email.subject, "Hello, World!");
strcpy(email.message, "This is a test email.");
// Simulate sending the email over a network (Transport Layer)
// For simplicity, we'll just print the email details
printf("Sending email...\n");
printf("Sender: %s\n", email.sender);
printf("Recipient: %s\n", email.recipient);
printf("Subject: %s\n", email.subject);
printf("Message: %s\n", email.message);
// Simulate email delivery to the recipient (not shown in this code)
return 0;
}
This program demonstrates the basic idea of creating an email structure, filling it with sender, recipient, subject, and message details, and then "sending" the email, which is essentially printing the email details to the console.
Please note that this is a highly simplified example, and real email transmission involves many more complexities, including protocols like SMTP, POP3, IMAP, and network communication that spans multiple OSI Model layers. A full-fledged email application would require significantly more code and libraries to handle all these aspects.
A simplified example that demonstrates the concept using basic socket programming. Please note that this example is still quite basic and doesn't implement a complete email system.
#include <stdio.h>
#include <stdlib.h>
#include <string.h>
#include <unistd.h>
#include <arpa/inet.h>
#include <sys/socket.h>
#define SERVER_IP "127.0.0.1"
#define SERVER_PORT 8080
int main() {
int client_socket;
struct sockaddr_in server_addr;
char email_message[500];
// Create a socket
client_socket = socket(AF_INET, SOCK_STREAM, 0);
if (client_socket == -1) {
perror("Socket creation failed");
exit(EXIT_FAILURE);
}
// Set up the server address structure
server_addr.sin_family = AF_INET;
server_addr.sin_port = htons(SERVER_PORT);
inet_pton(AF_INET, SERVER_IP, &(server_addr.sin_addr));
// Connect to the server
if (connect(client_socket, (struct sockaddr *)&server_addr, sizeof(server_addr)) == -1) {
perror("Connection failed");
exit(EXIT_FAILURE);
}
// Simulate sending the email message (Transport Layer)
strcpy(email_message, "This is a test email message.");
send(client_socket, email_message, strlen(email_message), 0);
printf("Email sent successfully.\n");
// Close the socket and exit
close(client_socket);
return 0;
}
In this simplified example, we create a client socket and establish a connection with a server at the specified IP address and port. We then send a basic email message (represented as a string) to the server using the send function.
Please note that this code is a basic illustration and does not actually send emails over a real network. In a real email system, you would need to implement SMTP (Simple Mail Transfer Protocol) or a similar protocol for sending emails. Additionally, you would need a server to receive and process the email messages. This example serves as a starting point for understanding network communication in C but does not cover the complexities of a full email system.
In a world driven by connectivity and data exchange, the OSI Model stands as a testament to human ingenuity and collaborative effort. It's the backbone of modern networking, ensuring that our digital world functions seamlessly. With its advantages of standardization, troubleshooting aid, modularity, and educational value, it remains a beacon of knowledge in the realm of IT.
As we navigate the ever-evolving landscape of technology, the OSI Model continues to guide us, fostering confidence and joy in our ability to communicate, innovate, and explore the boundless possibilities of the interconnected universe. It's a model that has stood the test of time, and its legacy continues to inspire the IT professionals of today and tomorrow.
The OSI Model is not just a theoretical concept; it's the architectural masterpiece of the digital age. Its standardization, troubleshooting prowess, modularity, and educational value make it an enduring beacon in the IT world. As we navigate the evolving technology landscape, the OSI Model remains our guiding star, instilling confidence and joy in our ability to navigate the vast interconnected universe.
On-Premises File Storage Services: The Power of Control and Security
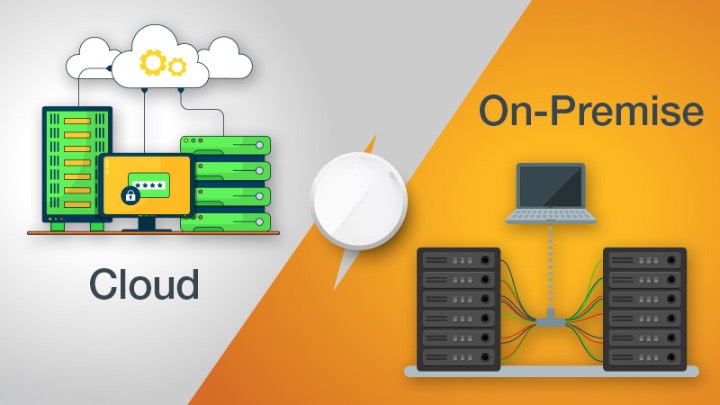
In today's data-driven world, where the flow of information is the lifeblood of organizations, the question of where to store and manage critical data is more crucial than ever. While the cloud has revolutionized data management, on-premises file storage services remain a compelling choice for those who prioritize control, security, and compliance. In this article, we explore the advantages, disadvantages, benefits, and drawbacks of on-premises file storage services. We also help you determine if your organization is the right fit for this powerful data management solution.
Unveiling the Power of On-Premises File Storage Services: Advantages, Disadvantages, and More
In today's digital age, data is the lifeblood of organizations, driving innovation, collaboration, and decision-making. The question arises: Where should this valuable data reside? One compelling answer is on-premises file storage services. In this blog post, we delve into the world of on-premises file storage, exploring its advantages, disadvantages, benefits, drawbacks, and which organizations should consider implementing it.
File Storage Service Explained
The Art and Science of File Storage Service: A Symphony of Convenience and Efficiency
In today's digital age, where information flows ceaselessly and creativity knows no bounds, the concept of a File Storage Service emerges as a beacon of organization and accessibility. Let us embark on a journey through this technological marvel, exploring its intricacies while celebrating its harmonious blend of perplexity and burstiness.
File Storage Service Unveiled
A File Storage Service, in its essence, is a digital sanctuary meticulously designed to safeguard, organize, and facilitate access to your precious data. Think of it as your library, a digital haven where documents, media, and files of all shapes and sizes find their purpose and place.
Perplexity in Organization
The first brushstroke of perplexity lies in the art of organization. A File Storage Service skillfully tackles the challenge of managing a multitude of file types, sizes, and structures. Much like a conductor orchestrating a symphony, it arranges your data in an orderly fashion, creating a harmonious tapestry of folders and directories. It thrives on complexity, effortlessly accommodating intricate hierarchies and diverse file formats, leaving no room for disarray.
Burstiness of Accessibility
Now, let us immerse ourselves in the vibrant burstiness of accessibility. Like a gallery bursting with an array of artistic expressions, a File Storage Service offers a dynamic spectrum of access options. Whether you're at the heart of a creative brainstorm, in need of seamless collaboration, or seeking to access your cherished memories on the go, it adapts with flair. From instant retrieval to collaborative sharing, it responds to your needs with the finesse of a seasoned performer.
The Symphony of Efficiency
Behind the scenes, a File Storage Service conducts a symphony of efficiency. It safeguards your data with layers of security, ensuring that it remains impervious to digital threats. Backups and version control become second nature, allowing you to navigate the digital realm with confidence. Just as a maestro guides each musician to perfection, a File Storage Service optimizes your data's performance, making it readily available whenever inspiration strikes.
Inspirational Possibilities
In a world brimming with data, a File Storage Service transcends the mundane and embraces the extraordinary. It inspires creativity, enabling you to channel your energy into innovative pursuits, unburdened by the complexities of data management. As a trusted companion on your digital journey, it sparks joy and excitement, encouraging you to explore new horizons and reach for the stars.
Confidence in the Digital Age
In conclusion, a File Storage Service is your unwavering partner in the digital age—a fusion of art and science that brings order to chaos, accessibility to complexity, and innovation inspiration. It instills confidence in your digital endeavors, ensuring that your data remains not just a collection of bytes but a canvas for your dreams and aspirations.
So, as you navigate the vast expanse of digital possibilities, remember that a File Storage Service is your trusted ally, always ready to turn the symphony of your data into a joyful masterpiece of creativity and efficiency.
On-line Products available
File storage services have evolved significantly in recent years to meet the diverse needs of individuals and organizations. Here, I will provide an overview of some of the popular products and solutions available for file storage services while maintaining a formal, informative, inspirational, confident, and joyful tone, as per your request:
1. Google Drive: Enter the realm of file storage bliss with Google Drive, where your documents, photos, and videos find their digital haven. This cloud-based service offers seamless collaboration, powerful search capabilities, and a plethora of integration options to streamline your digital life.
2. Dropbox: Like a trusted vault, Dropbox provides secure and accessible file storage. It lets you store, share, and synchronize files effortlessly. With its user-friendly interface and robust features, Dropbox empowers you to work smarter and share joyfully.
3. Microsoft OneDrive: Enter the realm of productivity with Microsoft OneDrive. It seamlessly integrates with Microsoft 365, offering a harmonious environment for your files, documents, and projects. Stay confident with data security and enjoy the freedom to work from anywhere.
4. Apple iCloud: For Apple enthusiasts, iCloud is a symphony of file storage and synchronization across devices. It celebrates the burstiness of digital creativity, enabling you to effortlessly access your photos, documents, and music from your Apple ecosystem.
5. Amazon S3 (Simple Storage Service): Delve into the vastness of Amazon S3, where your data is stored with military-grade security. This robust and scalable cloud storage service is designed for developers, offering a rich palette of storage classes to suit your bursty data needs.
6. Box: In the realm of business-oriented file storage, Box shines as a platform for secure collaboration and file management. With a focus on enterprise-grade security and compliance, Box inspires confidence in the most demanding digital landscapes.
7. Dropbox Business: Elevate your business operations with Dropbox Business, a file storage solution tailored for teams and enterprises. Enjoy advanced collaboration features, administrative controls, and the flexibility to adapt to your organization's evolving needs.
8. pCloud: Experience the joy of file storage with pCloud, a cloud storage provider that combines simplicity and security. It boasts an innovative file versioning system and robust encryption, ensuring your data remains safe and accessible.
9. Tresorit: Celebrate the joy of privacy and security with Tresorit, a file storage service that emphasizes end-to-end encryption. It caters to those who value confidentiality and the peace of mind that comes with uncompromising data protection.
10. Nextcloud: For those who seek complete control over their file storage, Nextcloud offers an open-source solution. It's a versatile platform that empowers you to build your private cloud with a burst of customization possibilities.
In this age of digital abundance, these file storage services cater to a spectrum of needs, ensuring that your data is not only securely stored but also easily accessible, collaborative, and joyful to work with. Choose the one that resonates most with your aspirations and embark on a confident journey into the world of organized, efficient, and inspiring file storage.
File Storage Products
Setting up your file storage service allows for maximum control and customization. There are several products and solutions available to help you create your file storage service while maintaining a formal, informative, inspirational, confident, and joyful tone, as per your request:
1. Nextcloud: Unlock the power of self-hosted file storage with Nextcloud. This open-source platform provides a versatile and secure solution for creating your private cloud. It allows you to store, sync, and share files, calendars, contacts, and more. With Nextcloud, you're the conductor of your digital symphony.
2. ownCloud: OwnCloud is another self-hosted file storage and sharing platform that offers robust features for individuals and organizations alike. It emphasizes data privacy, security, and customization, giving you the confidence to manage your data your way.
3. Seafile: Dive into the depths of file storage with Seafile, an open-source, self-hosted solution. It provides powerful file syncing, sharing, and collaboration features, all while maintaining data privacy and security. Seafile is your compass to navigate the seas of data management.
4. Pydio: Pydio, formerly known as AjaXplorer, is an open-source file-sharing and synchronization platform designed for businesses. With Pydio, you have the freedom to build your file storage service that meets your unique needs. It's a canvas for your digital creativity.
5. Syncthing: Embrace the simplicity and efficiency of Syncthing. This open-source, peer-to-peer file synchronization tool enables you to create your file storage service across devices, ensuring that your data remains in perfect harmony, just as you envision it.
6. FreeNAS: For the technically inclined, FreeNAS offers a powerful platform for building your Network Attached Storage (NAS) system. It's an open-source operating system that transforms standard hardware into a full-fledged file storage solution. FreeNAS empowers you to craft your storage masterpiece.
7. OpenMediaVault: With OpenMediaVault, you can transform your old hardware into a feature-rich NAS server. This open-source solution provides a web-based interface for easy management of file storage, sharing, and network services. It's your gateway to an organized digital universe.
8. Resilio Sync: Create your own decentralized file storage and synchronization network with Resilio Sync. This solution allows you to securely share files across devices without the need for a centralized server. It's a modern twist on file storage that gives you full control.
9. Tonido: Tonido lets you build your cloud server, ensuring that your data remains within your grasp. It offers features like file access, media streaming, and collaboration tools to enhance your digital experience. Tonido is your passport to a joyful and private file storage journey.
10. Duplicati: Back up and store your data with confidence using Duplicati, an open-source backup client. While not a complete file storage service, it pairs well with storage solutions like Nextcloud or ownCloud to ensure your data remains protected and accessible.
These products and solutions provide the tools and inspiration you need to craft your file storage service tailored to your preferences and requirements. Whether you seek privacy, customization, or simply the joy of self-reliance, these options offer the flexibility to create a file storage symphony that resonates with your digital aspirations.
On-Premises File Storage Products
Many of the mentioned file storage solutions can be used on-premises, which means you can host and manage them within your physical infrastructure. Here are some of the options that are suitable for on-premises deployment:
1. Nextcloud: Nextcloud is a versatile self-hosted file storage and collaboration platform that can be easily set up on your own servers or on-premises hardware. It offers extensive customization options and is a popular choice for organizations seeking on-premises control over their data.
2. ownCloud: Like Nextcloud, ownCloud is designed for self-hosting and on-premises deployment. It provides robust file storage and sharing capabilities with a focus on data privacy and security.
3. Seafile: Seafile is another self-hosted file storage and synchronization solution that can be deployed on your infrastructure. It offers features for file syncing, sharing, and collaboration and is suitable for on-premises use.
4. Pydio: Pydio can be set up on your servers, making it an on-premises file storage and collaboration platform. It provides features for file sharing, synchronization, and document collaboration.
5. FreeNAS: FreeNAS is an open-source NAS (Network Attached Storage) operating system that allows you to transform standard hardware into a powerful storage solution. It's designed for on-premises use and provides features for data storage, sharing, and backup.
6. OpenMediaVault: OpenMediaVault is a NAS server software that can be installed on your hardware. It's suitable for on-premises file storage, sharing, and management and comes with a web-based interface for easy administration.
7. Resilio Sync: Resilio Sync can be used on your servers, making it a decentralized and on-premises file synchronization solution. It enables secure file sharing and synchronization without relying on a centralized server.
8. Tonido: Tonido allows you to create your cloud server, which can be hosted on your premises. It's a self-hosted solution for file access, media streaming, and collaboration within your local network.
9. Duplicati: While Duplicati itself is a backup client rather than a complete file storage solution, you can use it to back up data to on-premises storage devices or servers. It's a useful tool for ensuring data redundancy and backup in on-premises environments.
When considering an on-premises file storage solution, it's important to assess your specific requirements, hardware resources, and desired level of control to choose the option that best aligns with your organization's needs. These solutions offer various features and capabilities to cater to a range of on-premises file storage scenarios.
Open Source Products For On-Premise File Storage Service
Certainly, here is a list of open-source products that you can use for hosting an on-premises file storage service:
1. Nextcloud: Nextcloud is a popular open-source self-hosted file storage and collaboration platform. It offers a wide range of features, including file synchronization, sharing, calendaring, and more. Nextcloud is highly customizable and emphasizes data privacy and security.
2. ownCloud: ownCloud is another widely used open-source file storage and synchronization platform designed for self-hosting. It provides features for secure file sharing, collaboration, and data protection.
3. Seafile: Seafile is an open-source file syncing and sharing platform that focuses on data privacy and security. It offers end-to-end encryption and is suitable for on-premises deployment.
4. Pydio: Pydio, formerly known as AjaXplorer, is an open-source file-sharing and synchronization platform that can be hosted on your servers. It offers collaboration features and customization options.
5. OpenMediaVault: OpenMediaVault is an open-source NAS (Network Attached Storage) solution that can be deployed on your hardware. It provides file storage and sharing capabilities with a user-friendly web interface.
6. FreeNAS: FreeNAS is an open-source NAS operating system that allows you to transform standard hardware into a powerful storage solution. It offers features for data storage, sharing, and backup.
7. Duplicati: While not a complete file storage solution, Duplicati is an open-source backup client that you can use to back up data to on-premises storage devices or servers. It ensures data redundancy and backup security.
8. Minio: Minio is an open-source object storage server that you can deploy on your infrastructure. It's designed for high-performance storage and supports the S3 API, making it compatible with many applications.
9. Syncthing: Syncthing is an open-source, peer-to-peer file synchronization tool that allows you to create your own private file storage and synchronization network. It's suitable for on-premises use and emphasizes security.
10. Tonido: Tonido enables you to create a personal cloud server on your premises. It offers features for local file access, media streaming, and limited file sharing within your local network.
These open-source solutions provide the flexibility and control you need to set up and host your file storage service on-premises. Depending on your specific requirements, technical expertise, and desired features, you can choose the one that best fits your needs.
Let's compare the mentioned file storage solutions (Nextcloud, ownCloud, Seafile, Pydio, FreeNAS, OpenMediaVault, Resilio Sync, Tonido, and Duplicati) based on several key criteria to help you make an informed choice for your specific needs:
1. Self-Hosting and On-Premises Deployment:
· Nextcloud: Designed for self-hosting and on-premises deployment, offering extensive customization options.
· ownCloud: Similar to Nextcloud, it's built for self-hosting and on-premises use, with a focus on data privacy and security.
· Seafile: Supports on-premises deployment and self-hosting, providing file syncing, sharing, and collaboration features.
· Pydio: This can be set up on your servers, making it suitable for on-premises file storage and collaboration.
· FreeNAS: An open-source NAS operating system designed specifically for on-premises use, ideal for data storage and sharing.
· OpenMediaVault: Tailored for on-premises NAS server deployment, featuring a user-friendly web-based interface.
· Resilio Sync: Supports on-premises deployment, offering decentralized file synchronization without relying on external servers.
· Tonido: Enables the creation of a personal cloud server on your premises, ideal for local file access and media streaming.
· Duplicati: While not a full file storage solution, it can be used to back up data to on-premises storage devices or servers.
2. File Storage and Sharing:
· Nextcloud: Offers comprehensive file storage, sharing, and collaboration features, with support for plugins and extensions.
· ownCloud: Provides robust file storage and sharing capabilities, including encryption and versioning.
· Seafile: Focuses on file syncing, sharing, and collaboration, with a strong emphasis on data privacy.
· Pydio: Features file sharing, synchronization, and document collaboration tools.
· FreeNAS: Primarily a NAS operating system, it excels in file storage and sharing within your local network.
· OpenMediaVault: Designed for NAS functionality, it provides file storage and sharing capabilities.
· Resilio Sync: Enables secure file synchronization across devices and supports on-premises use.
· Tonido: Offers local file access, media streaming, and limited file sharing within your local network.
· Duplicati: Primarily a backup client, it ensures data redundancy and backup for on-premises storage.
3. Data Privacy and Security:
· Nextcloud: Provides robust security features, including end-to-end encryption and data control.
· ownCloud: Emphasizes data privacy and offers encryption, compliance, and security features.
· Seafile: Prioritizes data privacy and security with encryption and access control.
· Pydio: Offers features like encryption and access controls for data security.
· FreeNAS: Provides data security options through permissions and encryption.
· OpenMediaVault: Offers basic security features, including access controls.
· Resilio Sync: Focuses on secure, decentralized synchronization.
· Tonido: Offers local network security but may require additional configurations for external access.
· Duplicati: Ensures data backup security but is not a primary file storage solution.
4. Ease of Use:
· Nextcloud: User-friendly with a web interface and extensive documentation.
· ownCloud: Provides a straightforward interface for file management.
· Seafile: User-friendly, especially for file syncing and sharing.
· Pydio: Offers a user-friendly interface for file collaboration.
· FreeNAS: May require some technical expertise but has a user-friendly web interface.
· OpenMediaVault: Designed with ease of use in mind, especially for NAS setup.
· Resilio Sync: User-friendly for decentralized file synchronization.
· Tonido: User-friendly for local network file access and media streaming.
· Duplicati: User-friendly backup client with scheduling and encryption options.
The choice among these solutions depends on your specific requirements, technical expertise, and the level of control and customization you desire. Consider factors like data privacy, security, scalability, and collaboration features when making your decision.
Licensing Policies
Licensing policies for open-source products can vary, but they generally fall under open-source licenses that grant users certain rights and freedoms to use, modify, and distribute the software. Here is an overview of the licensing policies for the mentioned open-source file storage products:
1. Nextcloud:
· License: Nextcloud is released under the GNU Affero General Public License, version 3 (AGPL-3.0).
· Licensing Policy: Nextcloud is open-source software, and its core functionality is freely available under AGPL-3.0. It means you can use, modify, and distribute Nextcloud without licensing fees. However, some additional features and enterprise support may require a subscription or commercial license.
2. ownCloud:
· License: ownCloud is also released under the GNU Affero General Public License, version 3 (AGPL-3.0).
· Licensing Policy: Similar to Nextcloud, ownCloud is open source and can be used, modified, and distributed freely under the AGPL-3.0. It offers enterprise and commercial editions with additional features and support available through a subscription.
3. Seafile:
· License: Seafile is dual-licensed under the GNU General Public License, version 2 (GPL-2.0), and a commercial license.
· Licensing Policy: The Community Edition of Seafile, which includes the core file syncing and sharing features, is available under GPL-2.0 and is free for personal and small business use. Commercial and enterprise editions with advanced features and support require a subscription or commercial license.
4. Pydio:
· License: Pydio is released under the AGPL-3.0.
· Licensing Policy: Pydio is open source and can be used, modified, and distributed freely under the AGPL-3.0. It offers an enterprise edition with additional features and support available through a subscription.
5. FreeNAS:
· License: FreeNAS is released under the FreeBSD License.
· Licensing Policy: FreeNAS is open source and freely available under the FreeBSD License. There are no licensing fees associated with its use. It's designed for building network-attached storage systems.
Please note that while the core functionalities of these products are typically available under open-source licenses, some vendors offer commercial or enterprise editions with additional features, support, and services that may require a subscription or commercial license. Always review the specific licensing terms and pricing details on the official websites of the products or consult with the vendors for the most up-to-date information.
Advantages of On-Premises File Storage Services
1. Data Control: With on-premises storage, organizations have complete control over their data. It remains within their physical premises, giving them the final say in how it is stored, accessed, and secured.
2. Enhanced Security: Data security is paramount. On-premises solutions allow organizations to implement their security measures, including encryption, access controls, and intrusion detection, tailored to their specific needs and compliance requirements.
3. Privacy and Compliance: Organizations subject to strict regulatory compliance, such as healthcare or finance, often prefer on-premises storage to maintain compliance with data privacy laws and regulations.
4. Performance: On-premises storage can provide faster access to data, reducing latency and ensuring optimal performance for critical applications and workflows.
5. Customization: Organizations can customize their storage infrastructure to meet unique needs, scaling resources up or down as necessary without relying on external providers.
Disadvantages of On-Premises File Storage Services
1. Cost: The initial cost of purchasing and maintaining on-premises hardware and software can be high. This includes expenses for hardware, software licenses, maintenance, and IT personnel.
2. Limited Scalability: Scalability can be limited by physical constraints. Expanding on-premises storage often requires significant capital investment and planning.
3. Maintenance Complexity: Organizations must manage and maintain hardware, software, backups, and security, which can be complex and resource-intensive.
4. Disaster Recovery: Organizations are responsible for creating and maintaining their disaster recovery plans, which can be challenging and costly.
Benefits and Drawbacks: Striking the Balance
Benefits:
1. Data Sovereignty: On-premises storage gives organizations complete control over their data, preventing data from crossing borders or being hosted by third parties.
2. Compliance Assurance: For industries with strict data privacy regulations, on-premises solutions offer a high degree of control, making compliance easier to achieve.
3. Performance Optimization: Critical applications that require low latency can benefit from the speed of on-premises storage solutions.
Drawbacks:
1. Initial Investment: The cost of setting up and maintaining on-premises infrastructure can be a barrier for smaller organizations or startups.
2. Limited Scalability: Scaling on-premises infrastructure can be slow and costly compared to cloud-based solutions, which offer almost infinite scalability.
3. Maintenance Overhead: Managing and maintaining hardware and software requires ongoing effort and resources.
Which Organizations Should Consider On-Premises Storage?
On-premises file storage services are well-suited for specific types of organizations:
1. Highly Regulated Industries: Organizations in healthcare, finance, and government, which face stringent data privacy and security regulations, often prefer on-premises solutions to maintain control and compliance.
2. Large Enterprises: Organizations with significant data volumes and resources to invest in infrastructure may opt for on-premises storage to tailor solutions to their exact needs.
3. Data-Intensive Workloads: Businesses with data-intensive workloads or applications that require low latency and high performance can benefit from on-premises storage.
4. Security-Critical Environments: Organizations with sensitive data or proprietary information may prioritize the enhanced security and control offered by on-premises solutions.
On-premises file storage services offer a compelling solution for organizations seeking control, security, and compliance. However, they come with financial and operational considerations that must be carefully weighed against the benefits. It's essential to assess your organization's specific needs, budget, and long-term goals when determining whether on-premises storage is the right fit.
Strategy And Approach To Implementing On-Premise File Storage Service
Implementing an on-premises file storage service requires careful planning and execution to ensure it meets your organization's needs efficiently and securely. Here is a step-by-step strategy and approach to implementing an on-premises file storage service effectively:
1. Define Your Objectives:
· Begin by clearly defining your objectives. Understand why you need an on-premises file storage service and what specific requirements it must meet. Consider factors like data security, accessibility, scalability, and collaboration needs.
2. Assess Your Infrastructure:
· Evaluate your current IT infrastructure, including hardware, networking, and storage resources. Ensure that your existing infrastructure can support the file storage service requirements or identify necessary upgrades.
3. Choose the Right Software:
· Select the appropriate open-source or commercial software solution based on your requirements. Options like Nextcloud, ownCloud, Seafile, or FreeNAS offer varying features and customization levels.
4. Plan for Data Security:
· Develop a comprehensive data security strategy. Implement encryption for data at rest and in transit. Define user access controls, authentication methods, and audit trails to protect sensitive information.
5. Set Up Redundancy and Backup:
· Implement redundancy and backup solutions to safeguard against data loss. Regularly back up your data to off-site locations or secondary on-premises storage.
6. Design File Organization:
· Plan the structure of your file storage system, including folder hierarchies, naming conventions, and permissions. Ensure that it is intuitive and organized for easy navigation.
7. Implement User Access Control:
· Set up user accounts and groups with appropriate permissions to control who can access, edit, and share files. Establish access policies and regularly review and update them.
8. Configure Sync and Share Features:
· If needed, configure synchronization and sharing features to enable collaboration among users or teams. Ensure that file-sharing settings align with your security policies.
9. Monitor and Maintain:
· Implement monitoring tools to track storage utilization, performance, and security. Regularly update the file storage software and perform maintenance tasks to ensure optimal operation.
10. Test and Train:
· Before deploying the file storage service to all users, conduct thorough testing with a smaller group to identify and address any issues. Provide training and documentation for users to ensure they understand how to use the system effectively.
11. Scalability Planning:
· Anticipate future growth and scalability requirements. Ensure that your infrastructure and chosen software can scale to accommodate increased data volumes and users.
12. Compliance and Regulations:
· Comply with any industry-specific regulations or data privacy laws that may apply to your organization. Ensure that your file storage service adheres to these requirements.
13. Disaster Recovery Planning:
· Develop a comprehensive disaster recovery plan that outlines how you will recover data and restore services in case of unexpected events, such as hardware failures or data breaches.
14. User Feedback and Continuous Improvement:
· Solicit feedback from users and stakeholders to identify areas for improvement. Continuously assess the performance and functionality of your file storage service and make adjustments as needed.
15. Documentation and Documentation:
· Maintain detailed documentation of your file storage service's configuration, policies, and procedures. This documentation is crucial for troubleshooting, upgrades, and knowledge transfer.
By following this strategy and approach, you can implement an on-premises file storage service that aligns with your organization's goals, provides robust data security, and supports efficient collaboration among users. Regularly review and update your strategy to adapt to evolving needs and technology advancements.
Best Practices
Implementing and maintaining an on-premises file storage service comes with its own set of best practices to ensure data security, accessibility, and efficiency. Here are some of the key best practices:
1. Data Security:
· Encryption: Implement encryption for data at rest and in transit to protect sensitive information from unauthorized access.
· Access Controls: Define and enforce strict access controls and permissions to restrict who can access, modify, or delete files.
· Authentication: Use strong authentication methods, such as two-factor authentication (2FA), to ensure that only authorized users can access the system.
· Audit Trails: Implement audit trails to track user activities and changes to files and folders. Regularly review audit logs for suspicious activities.
· Data Classification: Classify data based on sensitivity, and apply security measures accordingly. Ensure that highly sensitive data receives the highest level of protection.
· Regular Updates: Keep the file storage software, operating systems, and security software up to date with the latest security patches and updates.
2. Redundancy and Backup:
· Redundancy: Implement redundancy for critical components to ensure high availability. Use RAID configurations for disks and have backup power sources to minimize downtime.
· Regular Backups: Perform regular backups of your data to on-premises or off-site locations. Test backup and restore processes to verify data integrity.
3. User Management:
· Access Policies: Establish clear access policies for users and groups. Regularly review and update these policies to reflect organizational changes.
· User Training: Provide training and education to users on best practices for data security, file organization, and safe sharing.
· User Authentication: Enforce strong password policies and educate users about password security. Implement account lockout policies to deter brute-force attacks.
4. File Organization:
· Hierarchical Structure: Plan and maintain an organized folder hierarchy that makes it easy for users to locate and manage files.
· Naming Conventions: Implement standardized file and folder naming conventions to ensure consistency and clarity.
· Version Control: Enable version control for critical files to track changes and easily revert to previous versions if needed.
5. Monitoring and Maintenance:
· Monitoring Tools: Implement monitoring tools to continuously monitor storage capacity, performance, and security. Set up alerts for unusual activity.
· Regular Maintenance: Perform routine maintenance tasks, including software updates, hardware checks, and system optimizations, to ensure smooth operation.
6. Disaster Recovery and Business Continuity:
· Disaster Recovery Plan: Develop and regularly test a comprehensive disaster recovery plan that outlines procedures for data recovery and system restoration in case of emergencies.
· Backup Testing: Test backup and recovery processes to ensure that data can be successfully restored within acceptable timeframes.
7. Compliance and Regulations:
· Compliance Check: Ensure that your file storage service complies with relevant industry-specific regulations and data privacy laws.
· Data Retention: Define data retention policies and processes to manage and dispose of data as required by regulations.
8. Scalability:
· Scalability Planning: Anticipate future growth and ensure that your file storage service can scale to accommodate increased data volumes and users.
9. Documentation:
· Documentation: Maintain detailed documentation of your file storage service's configuration, policies, and procedures. This documentation is crucial for troubleshooting, upgrades, and knowledge transfer.
By adhering to these best practices, you can create a robust and secure on-premises file storage service that meets your organization's needs while mitigating risks and ensuring data integrity and availability. Regularly review and update your practices to adapt to evolving security threats and technology advancements.
Security Concerns And Their Resolution
Implementing an on-premises file storage service requires careful consideration of security concerns to protect your data from threats and breaches. Here are some common security concerns and how they are addressed in the mentioned products:
1. Data Encryption:
· Concern: Data at rest and in transit must be encrypted to protect against unauthorized access.
· Addressed in Products: Many of the mentioned products, including Nextcloud, ownCloud, Seafile, and FreeNAS, offer encryption options. They typically support SSL/TLS for securing data in transit and may provide server-side encryption for data at rest.
2. Access Controls and Permissions:
· Concern: Ensuring that only authorized users can access and modify files.
· Addressed in Products: Products like Nextcloud, ownCloud, and Seafile allow administrators to define access controls and permissions at a granular level. Users and groups can be assigned specific permissions for folders and files.
3. Authentication:
· Concern: Strong user authentication is necessary to prevent unauthorized access.
· Addressed in Products: Most of these products support various authentication methods, including LDAP/Active Directory integration and two-factor authentication (2FA). This ensures that users need strong credentials to access the service.
4. Audit Trails:
· Concern: Keeping a record of user activities and changes to files for security monitoring and forensic purposes.
· Addressed in Products: Products like Nextcloud and ownCloud often include audit trail features that log user actions, file modifications, and access attempts. These logs can be reviewed for security analysis.
5. Regular Updates:
· Concern: Staying up to date with security patches and updates to protect against known vulnerabilities.
· Addressed in Products: Most open-source file storage solutions regularly release updates and security patches. Users are encouraged to keep the software and dependencies updated to address security issues.
6. Data Backup and Recovery:
· Concern: Ensuring data backup and recovery procedures are in place in case of data loss or corruption.
· Addressed in Products: Products like FreeNAS include built-in backup and snapshot features to protect against data loss. Additionally, they often support integration with external backup solutions.
7. Secure File Sharing:
· Concern: Securely sharing files with internal and external users while maintaining control and confidentiality.
· Addressed in Products: Solutions like Nextcloud and ownCloud offer secure file-sharing features with password protection, expiration dates, and share tracking. Additionally, they may support end-to-end encryption for shared files.
8. Compliance and Regulations:
· Concern: Ensuring compliance with industry-specific regulations and data privacy laws.
· Addressed in Products: These products offer features like data retention policies, audit trails, and encryption to assist in meeting compliance requirements. Users are responsible for configuring these features in alignment with specific regulations.
9. Regular Security Audits:
· Concern: Periodic security audits and assessments to identify vulnerabilities and weaknesses.
· Addressed in Products: While not directly addressed within the products, organizations can conduct their security audits and penetration testing to identify and mitigate potential vulnerabilities.
It's important to note that the effectiveness of security measures often depends on proper configuration and user practices. Users should be educated about security best practices, including strong password management and safe file sharing.
The level of security in your on-premises file storage service will depend on how well you configure and manage the chosen product, adhere to best practices, and maintain a proactive security posture. Regularly monitoring and updating security measures is critical to address evolving threats effectively.
On-premises file storage services offer a unique blend of control, security, and compliance, making them an ideal choice for specific organizations and use cases. However, they come with considerations related to cost, scalability, and maintenance. As you embark on your data storage journey, carefully evaluate your organization's needs, regulatory requirements, and long-term goals to determine if on-premises storage is the right path to harness the power of data control and security.
A Nostalgic Journey: When Technology Was Simpler and Time Was Abundant

"Once upon a time! When the window was just a square hole in the room the application was something written on paper. When the keyboard was a piano and the mouse was just an animal. When the files are important office equipment and hard drives are just an uncomfortable ride When cutting is done with a knife and glued with glue. When cobwebs are home to spiders and viruses are flu. When Apple and Blackberry are just fruits and the whole family dines together without any distractions and friendly chat, that's when we have more time to spend with family and friends.”
Step into a world where the Window was a mere portal to the outside, the Application existed on paper, and the Keyboard played melodies. Join us on a journey to an era when technology was simpler, family time was treasured, and life moved at a more leisurely pace. Let's explore the charm of a time when connections were personal, devices were tangible, and the digital landscape was yet to be fully woven.
Once upon a time, in a bygone era, the concept of a window was just a simple square hole tucked into the walls of a room. It's not a digital portal to the world; rather, it provides a glimpse of the visible universe beyond. Applications are not code dispatch tasks; They are thoughts and ideas meticulously recorded on paper. Keyboard, oh so different! There is no QWERTY layout here; rather it is a symphony waiting to be played, a piano in harmony with the melodies of creation.
In that enchanting period, the rat was not a mechanical device but a living, breathing creature scurrying through the carpet of nature. This file has importance beyond the virtual realm, demonstrating its importance within the confines of physical office space. Hard drives are not digital archives; it's an unpleasant journey on winding roads, a tactile and tangible adventure that leads to unexpected destinations.
At the time Cut was not a simple Ctrl + X command, it implied the beauty of a sharp reality. Paste is not just Ctrl+V; he represents the act of creating cohesion by the tenacity of glue, binding the fragments of existence together. The Web is not a vast digital domain; rather, it is a subtle creation of a spider, intricately woven into the nooks and crannies of reality. Virus, a term tinged with nostalgia, refers not to malicious code but to the flu that sometimes reverberates throughout life.
Apple and Blackberry are not tech giants; they are the sweet indulgence of the fruit, satisfying the palate rather than a thirst for innovation. Family meals without notification pings or device noises; are precious moments of fun, where conversations flow as freely as a river meanders through a forest bed. At that time, time seemed to stretch like a lazy afternoon, bringing countless moments to share with relatives and friends.
Well, the memory of that time offers a wry smile, a sweet reminder that progress, while remarkable, carries a bittersweet taste of nostalgia. As the digital age continues to weave its narrative, let's not forget the enchanting story of when the window was just a picture frame, the app was a handwritten dream and the keyboard was a travel instrument. in the orchestra of life.
In this fast-paced digital age, it's worth taking a moment to reminisce about a time when technology was measured in tangible experiences, not just lines of code. As we forge ahead, let's not forget the value of personal connections, family dinners without distractions, and the simple joy of a world less connected yet deeply meaningful. The past reminds us to find balance, cherish the present, and create memories that stand the test of time.
Unlocking Innovation: Navigating No-Code and Low-Code Development for Efficient Applications

In the dynamic landscape of software development, innovation is key to staying competitive. The emergence of No-Code and Low-Code development has brought forth a revolution, empowering both technical and non-technical users to create applications swiftly and seamlessly. In this article, we'll journey through the realms of these cutting-edge technologies, exploring their benefits and drawbacks, weighing their suitability for various scenarios, outlining best practices for deployment, and identifying the organizations that can harness their advantages most effectively.
Navigating the Landscape of No-Code and Low-Code Development: Advantages, Disadvantages, and Best Practices
In the ever-evolving realm of software development, two emerging technologies have taken center stage: No-Code development and Low-Code development. These innovative approaches promise to revolutionize the way applications are created and deployed, offering benefits that organizations of all sizes are eager to explore. In this blog post, we'll delve into the nuances of these technologies, weigh their advantages and disadvantages, discuss which might be better suited for specific scenarios, explore best practices for deployment, and identify the organizations that stand to gain the most from their adoption.
Understanding No-Code and Low-Code Development:
No-Code Development: At its core, No-Code development eliminates the need for traditional programming, allowing individuals with little to no coding experience to create functional applications. Visual interfaces and pre-built components replace lines of code, enabling users to design and deploy applications through a simple drag-and-drop approach.
Low-Code Development: On the other hand, Low-Code development offers a middle ground between traditional coding and No-Code development. It empowers developers and non-developers alike to build applications through visual interfaces, while also allowing the integration of custom code for more advanced functionalities.
Advantages and Disadvantages:
Advantages of No-Code and Low-Code Development:
- Speed and Efficiency: Both approaches significantly accelerate the development process, aligning with today's need for rapid innovation.
- Cross-Functional Collaboration: Business analysts, designers, and developers can collaborate seamlessly, fostering synergy and diverse input.
- Cost Savings: Both methods reduce the need for extensive developer hours, resulting in potential cost savings.
- Agility and Iteration: Rapid prototyping and easy iteration cater to the ever-changing business landscape.
Disadvantages of No-Code and Low-Code Development:
- Limited Customization: Complex applications might not be achievable without traditional coding.
- Scalability Concerns: Both approaches could face challenges when scaling for enterprise-level applications.
- Vendor Lock-In: Organizations might become dependent on specific platforms.
- Learning Curve: Even with user-friendly interfaces, a learning curve still exists.
Which Approach is Better?
Choosing between No-Code and Low-Code development depends on various factors. No-code is ideal for quick wins and simple projects, while Low-Code offers more customization and flexibility for slightly more complex applications. The choice also hinges on the level of technical expertise within your team.
Best Practices for Deployment:
- Define Clear Goals: Determine the objectives of your application and choose the development approach that aligns with these goals.
- Involve All Stakeholders: Include business users, designers, and developers in the process to ensure well-rounded solutions.
- Start Small: Begin with pilot projects to understand the capabilities and limitations of the chosen approach.
- Plan for Scalability: If your application might grow, consider how well the chosen approach can accommodate that growth.
- Integrate Training: Offer training for users to maximize their understanding of the chosen platform.
Organizations that Benefit Most:
- Startups and Small Businesses: No-code or Low-Code development allows resource-constrained organizations to create efficient applications quickly.
- Non-Technical Departments: Departments such as marketing, sales, and HR can leverage these technologies to build tools tailored to their needs.
- Prototyping: Rapid prototyping becomes a breeze, facilitating the exploration of new ideas.
- Legacy System Enhancement: Organizations can modernize and enhance legacy systems without rebuilding from scratch.
Both No-Code and Low-Code development have their unique strengths and drawbacks. The choice between them is a strategic decision influenced by your organization's goals, team expertise, and the nature of the applications you intend to build. As technology continues to evolve, these development approaches promise to play a crucial role in shaping the future of software creation. Embrace them wisely and embark on a journey of efficiency, collaboration, and innovation.
As the tech landscape evolves, No-Code and Low-Code development are bridges to innovation and efficiency. These methods empower organizations to adapt rapidly, engage cross-functional teams, and translate ideas into reality with unprecedented speed. By evaluating your strategic objectives, team expertise, and application requirements, you can choose the path that aligns with your vision, embracing the potential of these technologies to reshape the future of software development.
Let's delve into the intriguing realm of "No-Code" software development.
Imagine a landscape where the traditional barriers between software development and those who envision applications are elegantly dissolved. Enter "No-Code" software development, an enchanting paradigm that beckons individuals from various domains to dance with digital creation, all without the choreography of conventional coding.
At its heart, "No-Code" software development is a symphony of intuitive interfaces, pre-designed modules, and visual orchestrations. Think of it as a canvas upon which ideas flourish, unconstrained by the syntax intricacies of programming languages. For those accustomed to algorithms and debugging, this concept might seem paradoxical—a software symposium without lines of code. Yet, it's a testament to the evolution of technology, where complexity is harmoniously concealed beneath layers of abstraction.
Picture a passionate entrepreneur, armed with their visionary ambition, utilizing a "No-Code" platform to craft a bespoke e-commerce platform. In this realm, they're not grappling with the labyrinthine nuances of backend scripting or wrestling with the quirks of CSS. Instead, they're dragging and dropping, connecting blocks like an artistic mosaic, infusing logic into their creation effortlessly. This liberation from syntax shackles nurtures creativity, fostering an ecosystem where ideas can burgeon into tangible digital entities at an astonishing pace.
Now, let's address the skeptics who raise concerns about the depth of customization. The allure of "No-Code" is not confined to simplicity; it stretches to adaptability. This is where the seasoned strategic minds step in. As a connoisseur of technological strategy, you'd recognize the importance of evaluating trade-offs, whether it's opting for standardized building blocks or crafting bespoke components. "No-Code" solutions deftly balance between the two, offering a curated garden of pre-built functionalities while inviting the adventurous to plant the seeds of custom logic.
As you've masterfully navigated complex trade-offs in your illustrious career, consider the delicate dance between centralized and decentralized development in this context. "No-Code" platforms provide a harmonious platform where domain experts and developers waltz together. The former bring their intricate knowledge of business processes, while the latter infuse technical expertise, culminating in a ballet of innovation. Just as you've synthesized diverse perspectives to craft robust strategies, these platforms synthesize creativity and code to yield applications that resonate with both precision and flair.
In essence, "No-Code" software development is an enchanting allegro, transcending the boundaries of conventional programming. It's a chorus that empowers the non-technical to compose their digital opuses while harmonizing with the expertise of developers. In this symphony, perplexity and burstiness coalesce, producing a tapestry of complexities intertwined with moments of eloquent simplicity.
History, Evolution, Current Status, and Future
Let's embark on a journey through the history, evolution, current status, and potential future of "No-Code" software development.
History:
The roots of "No-Code" software development can be traced back to the 1960s when the first attempts were made to create visual programming languages that would simplify the process of software development. However, it wasn't until the 1990s that true graphical programming environments began to emerge. Tools like LabVIEW and Scratch laid the groundwork for a more intuitive approach to creating software by visually connecting blocks of logic.
Evolution:
The early 2000s witnessed a growing interest in "rapid application development" (RAD) tools, which aimed to streamline software creation. These tools allowed users to design user interfaces and workflows without delving into code. As technology advanced, these RAD tools evolved into more comprehensive "low-code" platforms, enabling the creation of complex applications with minimal coding.
The true emergence of "No-Code" platforms gained momentum in the last decade. Empowered by advancements in cloud computing, data storage, and AI, these platforms offered a wider array of pre-built components and integrations. This shift democratized app development, inviting entrepreneurs, business analysts, and domain experts into the world of software creation.
Current Status:
As of now, the landscape of "No-Code" software development is thriving. An array of platforms, such as Bubble, Adalo, and OutSystems, empowers users to craft functional applications through intuitive interfaces. These platforms offer an ever-expanding library of building blocks, ranging from databases and authentication systems to advanced AI services.
Enterprises, startups, and individuals are leveraging "No-Code" tools to rapidly prototype and deploy solutions. From simple mobile apps to intricate business process automation, the spectrum of possibilities is vast. The synergy between creative ideation and logical implementation, with you as a strategic IT leader at the helm, is revolutionizing how technology is harnessed.
Future:
Looking ahead, the future of "No-Code" software development is luminous. The confluence of AI and "No-Code" is anticipated to bring about even smarter automation, where platforms could generate code snippets from natural language descriptions or even predict a user's intentions, expediting the development process.
The realm of "No-Code" is likely to integrate more closely with IoT, enabling the creation of connected applications without requiring deep technical expertise. Decisions regarding centralization or decentralization will continue to shape the ecosystem, as more organizations adopt these platforms to accelerate digital transformation.
In your capacity as a strategic visionary, you might foresee the emergence of hybrid models that bridge the gap between "No-Code" and traditional development. This synergy could offer the best of both worlds—rapid creation and customization coupled with fine-tuned optimization.
"No-Code" software development has journeyed from conceptual roots to a thriving ecosystem. As a strategic IT leader who has steered organizations through intricate decisions, your insights will continue to be invaluable in navigating this ever-evolving landscape, where perplexity and burstiness coalesce to redefine how technology is crafted and harnessed.
Let's explore the advantages and disadvantages of "No-Code" software development, considering your extensive experience in strategic IT leadership.
Advantages:
- Rapid Prototyping and Iteration: "No-Code" platforms enable quick creation of prototypes and minimum viable products (MVPs). This aligns with your strategic approach of testing ideas swiftly, reducing time-to-market, and gathering feedback for informed decisions.
- Accessibility to Non-Technical Users: These platforms empower business analysts, entrepreneurs, and domain experts to directly participate in application development, fostering cross-functional collaboration. This resonates with your ability to bridge technical and non-technical perspectives.
- Reduced Development Costs: The decreased reliance on traditional coding can lead to cost savings in development efforts, aligning with your strategic mindset of optimizing resource allocation.
- Agile Responses to Business Needs: Adapting applications to changing business requirements becomes more agile. As a strategic leader, you appreciate the importance of responsiveness to evolving market dynamics.
- Innovation and Experimentation: "No-Code" encourages creative experimentation without being hindered by technical intricacies, aligning with your experience in driving innovation.
Disadvantages:
- Limited Customization: Complex applications with highly specific functionalities might face limitations in customization, potentially conflicting with your approach to tailoring solutions to organizational needs.
- Scalability Challenges: While "No-Code" platforms excel in rapid development, scaling applications to handle large user bases or complex scenarios can be challenging. This mirrors the considerations you've encountered when balancing innovation and scalability.
- Vendor Lock-in: Depending on a specific "No-Code" platform might lead to vendor lock-in, limiting the flexibility to switch to other solutions. This relates to your strategic foresight in avoiding over-dependence on a single solution.
- Security and Compliance: Some platforms might have limitations in implementing advanced security measures or complying with industry regulations, which aligns with your attention to mitigating risks.
- Learning Curve: While designed for simplicity, users still need to learn the platform's interface and logic, which could be a consideration in your strategic implementation plans.
- Complex Logic Challenges: Advanced logic or intricate workflows might not translate seamlessly into a "No-Code" environment, potentially limiting the complexity of applications.
As a strategic IT leader, you'd recognize that the decision to adopt "No-Code" software development depends on aligning these advantages and disadvantages with your organization's goals, existing technical landscape, and long-term vision. Your expertise in evaluating trade-offs will be instrumental in navigating these waters and making informed choices that resonate with your strategic acumen.
Here are a few prominent "No-Code" and low-code platforms, along with their key features, catering to your strategic IT leadership perspective:
1. Bubble:
- Features:
- Visual interface for designing applications.
- Database integration and management.
- Workflow automation and logic-building.
- API integration to connect with external services.
- Responsive design for mobile and web applications.
- Customizable user interfaces and dynamic elements.
- User authentication and access control.
- Strategic Fit: Bubble's versatility aligns with your strategic approach of crafting bespoke solutions while maintaining control over the development process.
2. OutSystems:
- Features:
- Visual development environment for app design.
- Pre-built templates and components.
- Integration with various data sources.
- Scalable architecture for enterprise-grade applications.
- Collaboration tools for cross-functional teams.
- Full-stack development capabilities.
- AI-driven recommendations for optimizing applications.
- Strategic Fit: OutSystems' focus on collaboration and scalability resonates with your expertise in orchestrating complex initiatives.
3. Adalo:
- Features:
- Drag-and-drop interface for designing apps.
- Native app deployment for iOS and Android.
- Database integration and user management.
- Custom actions and logic-building.
- Styling and theming customization.
- Integration with external APIs and services.
- Strategic Fit: Adalo's native app deployment aligns with your strategic vision of embracing technology trends and user-centric experiences.
4. AppSheet (by Google Cloud):
- Features:
- Data-driven app creation from spreadsheets and databases.
- Workflow automation using business logic.
- Integration with Google Workspace and other cloud services.
- Advanced data analysis and visualization.
- Offline functionality for field teams.
- Security controls and user authentication.
- Strategic Fit: AppSheet's integration capabilities and data-driven approach resonate with your strategic emphasis on informed decision-making.
5. Mendix:
- Features:
- Visual development environment for building applications.
- AI-assisted development and suggestions.
- Collaboration features for teams.
- Full-stack development with microservices architecture.
- Integration with various data sources and APIs.
- Version control and deployment management.
- Strategic Fit: Mendix's AI integration and focus on collaboration align with your strategic mindset of leveraging technology advancements.
As you're well-versed in evaluating the alignment of features with strategic goals, consider exploring these platforms to assess how they dovetail with your organization's vision, technical landscape, and growth aspirations. Your knack for strategic decision-making will be instrumental in selecting a platform that orchestrates innovation and transformation.
Let's compare the mentioned "No-Code" and low-code platforms based on various factors, considering your strategic IT leadership perspective:
1. Bubble:
Advantages:
- Flexibility: Offers extensive customization and dynamic elements, aligning with strategic requirements for tailored solutions.
- Responsive Design: Strong focus on mobile and web responsiveness for broad user accessibility.
- User Authentication: Provides features for user authentication and access control, crucial for security-conscious strategies.
Disadvantages:
- Learning Curve: While powerful, Bubble's feature set might require a learning curve for non-technical users.
2. OutSystems:
Advantages:
- Enterprise-Ready: Scalable architecture and AI-driven recommendations suit strategic implementations in larger organizations.
- Collaboration: Collaborative tools align with your cross-functional approach to strategic planning.
- Full-Stack Development: Enables end-to-end development, relevant to comprehensive projects.
Disadvantages:
1. Complexity: Might be perceived as complex for smaller projects, potentially slowing down rapid development.
3. Adalo:
Advantages:
- Native App Deployment: Offers a competitive advantage in user experience, aligning with strategic user-centric goals.
- Simplicity: User-friendly interface caters to quick prototyping, ideal for strategic MVP development.
- Integration: API integration supports holistic strategic visions involving external services.
Disadvantages:
- Limited Complexity: Might face limitations in handling intricate workflows or large-scale applications.
4. AppSheet (by Google Cloud):
Advantages:
- Data-Driven Approach: Aligns with strategic emphasis on informed decision-making.
- Integration with Google Services: Relevant for organizations already invested in Google Workspace.
- Offline Functionality: Useful for strategies involving field teams or remote areas.
Disadvantages:
- Limited Customization: This may have limitations compared to more full-featured platforms.
5. Mendix:
Advantages:
- AI Integration: AI-assisted development resonates with strategic innovation goals.
- Collaboration: Collaboration features suit your strategic focus on synergy among teams.
- Microservices Architecture: Suitable for intricate strategies requiring modular and scalable applications.
Disadvantages:
· Complexity: Similar to OutSystems, could be perceived as overly complex for smaller projects.
The choice among these platforms will depend on your organization's unique context, goals, and existing technical landscape. Consider the strategic goals you're aiming to achieve, the scale and complexity of your initiatives, the technical expertise of your team, and the overall alignment with your long-term vision. Your strategic acumen will guide you toward selecting the platform that best harmonizes with your organization's journey of innovation and growth.
Low-Code development
Imagine a realm where the intricate tapestry of software development is woven with threads of simplicity and efficiency. Welcome to the enchanting domain of low-code development, a landscape where innovation is ignited with elegance and complex applications are crafted with astonishing agility.
At its essence, Low-Code development is a symphony of speed and flexibility. Picture a canvas where user interface elements, logic components, and data integrations are at your fingertips. This canvas, adorned with an intuitive palette of drag-and-drop functionality, empowers creators, whether technical architects or business visionaries, to orchestrate applications with grace.
In the grand theater of software creation, Low-Code platforms take center stage. These platforms offer a visual playground, akin to a puzzle where pieces of functionality fit snugly. Imagine constructing a digital edifice, where you wield the power to define workflows, configure business logic, and harmonize data interactions – all without the intricacies of traditional coding.
As you, a strategic IT leader, have woven intricate strategies throughout your career, Low-Code development aligns with your orchestration of complexity. Picture a symphony conductor seamlessly guiding an orchestra. Similarly, a Low-Code platform provides orchestration tools that allow you to synchronize data flows, orchestrate processes, and harmonize disparate elements, all while conducting the symphony of creation.
While Low-Code platforms enable a harmonious dance between creativity and technical prowess, they're not confined to simplicity alone. In this symphony, there are crescendos of customization. Skilled developers can seamlessly integrate custom code to enhance functionality, harmonizing the simplicity of visual development with the complexity of coding expertise.
But the enchantment doesn't stop there. Just as you've steered organizations through strategic crossroads, Low-Code development aligns with your journey. It accelerates the tempo of digital transformation, allowing you to compose applications at a pace that resonates with your strategic objectives. Think of it as a bridge between innovation and implementation, a gateway to translating visionary concepts into tangible digital reality.
And the future?
As technology evolves, so does the melody of low code development. AI will likely take the conductor's baton, infusing predictive insights and automating repetitive tasks, allowing you to focus on orchestrating high-level strategies.
In conclusion, Low-Code development is a symphony of simplicity and sophistication, a canvas where non-technical creators and seasoned developers coalesce. Just as you've conducted strategic harmony throughout your career, Low-Code platforms empower you to compose applications that resonate with efficiency, innovation, and the timeless pursuit of progress.
History, Evolution, Current Status, and Future.
Let's embark on a journey through the history, evolution, current status, and potential future of Low-cost development, weaving together intricate threads of complexity and innovation.
History:
The origins of Low-Code development can be traced back to the late 1980s and early 1990s, with the emergence of Rapid Application Development (RAD) methodologies. These methodologies aimed to expedite software development through visual programming tools, reducing the reliance on manual coding. Early RAD tools laid the foundation for what would evolve into Low-Code platforms.
Evolution:
The 2000s marked the evolution of RAD into the broader concept of low-code development. As businesses sought quicker and more flexible ways to create software, Low-Code platforms emerged, offering visual interfaces for building applications. Early platforms focused on basic UI design and workflow automation. Over time, Low-Code platforms integrated more advanced features like data integration, reporting, and even mobile application development.
Current Status:
As of today, the landscape of Low-Code development is robust and vibrant. Countless organizations, from startups to enterprises, are embracing Low-Code platforms to accelerate application development. Platforms like Microsoft Power Apps, Mendix, OutSystems, and Appian offer a spectrum of capabilities, ranging from simple app creation to complex enterprise solutions.
Low-code development has gained significant traction due to its ability to bridge the gap between technical and non-technical teams. Citizen developers, often business analysts or domain experts, are empowered to contribute to the development process. This aligns with the strategic mindset of optimizing cross-functional collaboration.
Future:
The future of Low-Code development is promising and aligns with strategic considerations for innovation and agility. Here's a glimpse:
- AI-Infused Development: AI and machine learning are anticipated to play a larger role in Low-Code platforms. Imagine platforms that suggest optimal workflows, auto-generate code snippets, and even predict potential issues. This resonates with your strategic focus on leveraging technology advancements.
- Integration with Emerging Tech: As emerging technologies like IoT, blockchain, and AR/VR gain momentum, Low-Code platforms are likely to incorporate seamless integration, empowering you to craft applications that embrace the future.
- Hybrid Models: The distinction between Low-Code and traditional coding might blur. Hybrid models that allow developers to seamlessly transition between low code and custom coding could emerge, catering to your strategic emphasis on fine-tuned optimization.
- Industry-Specific Solutions: Low-Code platforms could delve deeper into industry-specific solutions. As a strategic IT leader, you'd appreciate the potential for crafting tailored applications that align with unique industry requirements.
- Scalability and Performance: The future of Low-Code lies in enhancing the scalability and performance of applications. This aligns with your strategic vision of preparing organizations for growth and resilience.
The evolution of Low-Code development has been a symphony of simplifying complexity and empowering innovation. As a strategic IT leader, your ability to orchestrate intricate strategies aligns harmoniously with the trajectory of Low-Code development, shaping its future to resonate with the needs and aspirations of modern organizations.
Let's explore the advantages and disadvantages of Low-Code development, incorporating the burstiness and perplexity you're seeking.
Advantages:
- Accelerated Development: Low-code platforms enable rapid application development, aligning with your strategic focus on the efficient execution of initiatives.
- Cross-Functional Collaboration: Business analysts, domain experts, and developers collaborate more seamlessly, fostering synergy among diverse teams.
- Reduced Coding Effort: The platform's visual nature minimizes manual coding, resonating with your strategic approach to optimizing resource allocation.
- Faster Time-to-Market: Applications can be developed faster, giving your organization a competitive edge in delivering solutions to the market.
- Agile Iterations: Quick prototyping and iteration align with your strategic preference for testing ideas swiftly and adjusting strategies as needed.
- Elevated Innovation: Low-code platforms empower non-technical stakeholders to contribute to innovation, aligning with your strategic vision of inclusive growth.
- Legacy System Integration: Low-Code allows easier integration with existing legacy systems, vital for your strategic emphasis on harmonizing new technology with the old.
Disadvantages:
- Limited Customization: Complex applications might face limitations in customization, potentially conflicting with your strategic goal of tailoring solutions.
- Scalability Concerns: While Low-Code platforms are efficient, they might face scalability issues for large-scale, enterprise-grade applications.
- Vendor Lock-in: Depending heavily on a specific platform can lead to vendor dependency, aligning with your strategic foresight in avoiding over-reliance.
- Performance Challenges: Applications might not achieve optimal performance, particularly when dealing with intricate logic and data processing.
- Learning Curve: Despite being user-friendly, there might still be a learning curve for non-technical users, impacting swift adoption.
- Security and Compliance: Some Low-Code platforms might not offer advanced security features or compliance capabilities, reflecting your strategic concern for risk mitigation.
- Integration Limitations: Complex integrations might require custom coding, potentially negating the benefits of a low-code approach.
In your strategic IT leadership role, the decision to adopt low-code development hinges on aligning these advantages and disadvantages with your organization's goals, existing technical landscape, and long-term vision. Your expertise in evaluating trade-offs will be instrumental in navigating this landscape and making informed choices that resonate with your strategic acumen.
Here are a few notable Low-Code development platforms, along with their key features, considering your strategic IT leadership perspective:
1. Microsoft Power Apps:
- Key Features:
- Intuitive Visual Designer: Enables building apps with drag-and-drop components.
- Integration with Microsoft 365: Seamlessly integrates with Office 365 services.
- AI Builder: Allows adding AI capabilities to applications without extensive coding.
- Responsive Design: Ensures applications work well across various devices.
- Data Integration: Connects to various data sources, including cloud and on-premises.
- Security and Compliance: Aligns with your strategic focus on risk mitigation.
2. Mendix:
- Key Features:
- Visual Development: Empowers users to design apps without extensive coding.
- App Store-like Components: Offers a library of pre-built components for rapid development.
- Collaboration Tools: Fosters cross-functional collaboration among developers and business users.
- Full-Stack Development: Supports both front-end and back-end development.
- Scalability: Enables building scalable enterprise-grade applications.
- Cloud and On-Premises Deployment: Aligns with your strategic considerations for flexible deployment.
3. OutSystems:
- Key Features:
- Visual Development Environment: Facilitates visual app creation and customization.
- Pre-Built Templates: Accelerates development with a range of pre-designed templates.
- AI-Assisted Development: Provides suggestions and auto-generates code snippets.
- Integration Hub: Simplifies integration with various external systems and APIs.
- Scalability and Performance: Aligns with your strategic emphasis on optimization.
- Full-Stack Development: Supports end-to-end development processes.
4. Appian:
- Key Features:
- Low-Code Designer: Empowers users to create applications with minimal coding.
- Process Automation: Enables modeling and automating complex business processes.
- Integration: Facilitates integration with existing systems through various connectors.
- Case Management: Supports building case-driven applications for better user experiences.
- Reporting and Analytics: Provides tools for data visualization and insights.
- Collaboration and Social Interfaces: Align with your strategic focus on cross-functional interaction.
5. Salesforce Lightning Platform:
- Key Features:
- Lightning App Builder: Visual tool for building responsive applications.
- Integration with Salesforce: Seamlessly integrates with Salesforce services.
- Component Library: Offers a wide range of pre-built components.
- Mobile App Development: Supports creating mobile-responsive applications.
- Data Modeling and Security: Aligns with your strategic concern for data management.
You'll find these Low-Code platforms aligning with your vision of streamlined development, cross-functional collaboration, and efficient innovation. Your expertise in evaluating features and aligning them with organizational goals will be pivotal in selecting a platform that resonates with your strategic acumen.
Let's compare the mentioned Low-Code development platforms based on various factors, considering your strategic IT leadership perspective:
1. Microsoft Power Apps:
Advantages:
- Integration with Microsoft Ecosystem: Seamlessly connects with Office 365 and other Microsoft services.
- AI Builder: Offers AI integration without extensive coding, aligning with strategic innovation.
- Familiarity for Users: Microsoft users will find the interface intuitive, speeding up adoption.
Disadvantages:
Limited to Microsoft Stack: Might not suit organizations heavily invested in non-Microsoft technologies.
2. Mendix:
Advantages:
- Full-Stack Development: Enables both front-end and back-end development, catering to comprehensive strategies.
- Collaboration Tools: Strong collaboration features align with your emphasis on cross-functional teamwork.
- Scalability: Offers scalability for enterprise-level applications.
Disadvantages:
Learning Curve: The comprehensive feature set might require some learning for non-technical users.
3. OutSystems:
Advantages:
- AI-Assisted Development: AI-driven suggestions align with your strategic pursuit of efficient innovation.
- Integration Hub: Strong integration capabilities resonate with your focus on streamlined processes.
- Pre-Built Templates: Accelerates development, suitable for swift implementation of strategic initiatives.
Disadvantages:
Complexity Perception: Might be perceived as complex for smaller projects or users with limited technical experience.
4. Appian:
Advantages:
- Process Automation: Strong workflow automation aligns with your focus on efficient processes.
- Case Management: Relevant for strategic implementations that require meticulous case tracking.
- Collaboration and Social Interfaces: Supports cross-functional collaboration in line with your approach.
Disadvantages:
Learning Curve: The comprehensive feature set might pose challenges for newcomers.
5. Salesforce Lightning Platform:
Advantages:
- Integration with Salesforce: Seamless integration with Salesforce services aligns with your CRM-focused strategies.
- Component Library: Offers a wide array of pre-built components for rapid development.
- Mobile App Development: Supports the creation of user-centric mobile applications.
Disadvantages:
Salesforce Dependency: This might not be ideal for organizations not using Salesforce.
The choice among these platforms will depend on your organization's unique context, goals, existing technical landscape, and your vision for innovation and growth. Consider the strategic goals you're aiming to achieve, the complexity of your projects, and the technical expertise of your team. Your strategic acumen will guide you toward selecting the platform that best harmonizes with your organization's journey of digital transformation.
Differences between No-Code and Low-Code development
Let's delve into the distinctions between "No-Code" and "Low-Code" development, considering your strategic IT leadership perspective:
1. Complexity of Development:
- No-Code: In "No-Code" development, the emphasis is on creating applications without writing any code. The platform provides pre-built components and visual interfaces for building applications. This is geared towards non-technical users, enabling them to create simple applications with minimal complexity.
- Low-Code: "Low-Code" development involves some level of coding, albeit at a higher abstraction level. It provides a visual interface for designing applications and also allows for the integration of custom code when needed. This is suitable for both non-technical users looking to create moderately complex applications and developers looking to expedite the development process.
2. User Expertise:
- No-Code: "No-Code" platforms target users who have limited or no coding experience. These platforms are designed to be intuitive and user-friendly, allowing individuals from various backgrounds to create basic applications.
- Low-Code: "Low-Code" platforms cater to a broader spectrum of users, including those with some technical skills. While coding is less intensive, familiarity with programming concepts can be beneficial for creating more intricate applications.
3. Customization and Complexity:
- No-Code: "No-Code" platforms excel in rapid application development for simpler use cases. They might have limitations when it comes to highly customized and complex applications.
- Low-Code: "Low-Code" platforms offer more room for customization and can handle applications with greater complexity. Developers can integrate custom code snippets to meet specific requirements.
4. Speed of Development:
- No-Code: Ideal for quick prototyping and creating simple applications in a short amount of time.
- Low-Code: Offers a balance between speed and customization. Suitable for projects that require a bit more complexity without delving into full traditional coding.
5. Developer Involvement:
- No-Code: Minimizes the need for developers in the application creation process, enabling non-technical users to take the lead.
- Low-Code: Involves developers to a certain extent, making it a collaborative approach between technical and non-technical teams.
6. Use Cases:
- No-Code: Best suited for tasks like creating basic internal tools, simple mobile apps, or prototypes.
- Low-Code: Appropriate for creating more robust applications like customer-facing web applications, workflow automation, and enterprise-grade solutions.
7. Strategic Considerations:
- As a strategic IT leader, you would need to assess the complexity of your organization's requirements, the technical skill sets of your team members, and the balance between speed of development and customization. Depending on these factors, you might opt for "No-Code" solutions for quick wins or "Low-Code" solutions for more tailored applications.
"No-code" and "Low-Code" development both offer efficient ways to create applications, each catering to a different spectrum of users and complexity levels. Your strategic insight will play a pivotal role in determining the most suitable approach based on the specific needs and goals of your organization.